Ever since the digital cameras, we’ve been clicking away a bit. We quickly have a large amount of photos. Use the Photos application to organize the photo library on a Mac running macOS 10.12 Sierra through macOS 10.14 Mojave.
Version macOS
A Mac works using the macOS operating system. This article is written for versions macOS 10.12 Sierra through macOS 10.14 Mojave. Do you have macOS 10.15 Catalina or later? Then get started with the article ‘Manage photos on Mac (macOS Catalina)’.
Program Photos
In early 2015, Apple introduced the Photos application as a replacement for long-time iPhoto. The program offers the possibility to import, manage and edit photos. Read in the article ‘Import photos to Mac’ how to put photos in the program.
Open the Photos program:
- click on finder > Programs.
- Double click on photos.
Menu
On the left side of the Photos window is a menu that gives access to the photos:
- photos
Here are all the photos in the library. The photos are automatically sorted by date. - Retrospects/Memorials
With Retrospects/Memories you relive special moments. The Photos program automatically creates short films of photos and videos that have been added in the past period. - Shared
Share photos with others from this tab using the iCloud Photo Sharing feature. - Albums
Here are a number of default folders that the program creates and in which it collects the images. Examples include a folder with all videos, a folder with favorite photos, and a folder with common faces. You can also create your own albums here, for example of the holidays.
Views
As we mentioned in the previous section, under ‘Photos’ are all the photos stored in the program. You will see all thumbnails of these photos. Adjust with the scroll bar  At the top left of the window, select the size of the thumbnails.
In addition, there are different views: Moments, Sets and Years. The Moments view shows all photos taken around the same time. Sets consist of Moments taken in the same place. The Years view shows all photos from a particular year. By clicking on a place name in one of these views, you will see all the photos taken in that place during that period. It is also possible to show a map with places where photos were taken. Click on the left menu for this Places.
Photo information
View a photo by double clicking on it. This photo has all kinds of information:
- At the top right of the window, click the icon with the letter i
 .
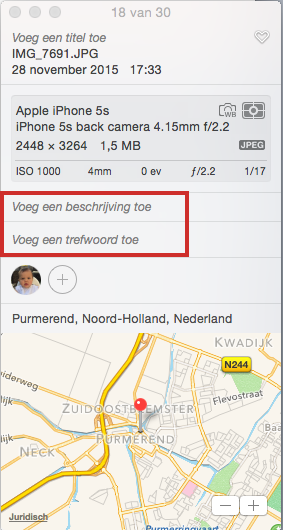
. - An overview with information about the photo opens, such as with which camera the photo was taken, the resolution and possibly where and when the photo was taken.
- To make the photos easier to search, add keywords or a description to the photo. Click on the Add a description or Add a keyword and type the information.

- Click on the red circle to close the window.
Search in photos
The Photos program also has a search function. Search the photos by place, date or name, for example. Even more convenient, you can also search by keywords and descriptions that you have given to photos. But the search function has even more possibilities. It is even possible to search for objects, such as dog. The program will then filter all photos that contain a dog.
The search bar is at the top right of the window. click on Search, type your search term and press the Enter key.
People
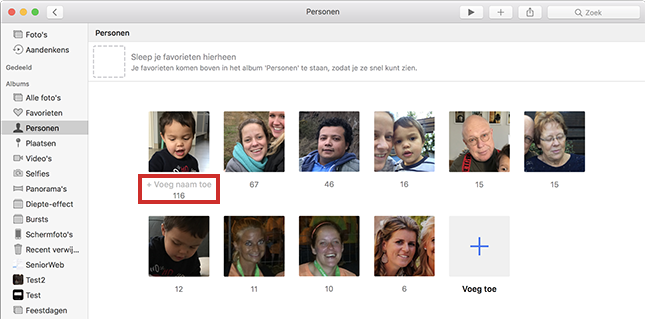
In the ‘Persons’ album, photos are organized based on facial recognition. This way you have an overview of all photos that feature a specific person.
- Click in the left menu People.
- This album contains photos of the people the program has recognized most often. Below the photo is the number of photos in which the person appears.
- Add the person’s name to the album. To do this, move the mouse over the photo and click + Name or + Add name.

- Type the name and press the Enter key.
- Double click on the person to view all photos. Use the arrow at the top left of the window to return to the overview.
- Is the same person twice in this overview?
- Click on the first photo, hold down the Cmd key and click on the second photo.
- Right click on the second photo again.
- click on Add 2 people together.
- click on merge.
Create albums
Users can also create their own albums. Think of an album from the holiday or family day.
- Click in the left menu My Albums (macOS 10.13 High Sierra) or Albums (macOS 10.12 Sierra).
- Click on the plus sign.
- click on Album.
- On macOS 10.12 Sierra, make sure ‘New Album’ is selected behind ‘Album’.
- Press the Backspace key on the keyboard. Type the name for your new album and click the Enter key.
- Click on the map photos.
- Right-click on a photo you want to add.
- click on add to and then the name of the new folder.
The album has been created and the photos have been added. In this way you can create all kinds of folders to give an overview to your photos.