
The free version of OneDrive is less generous than Google Drive with 2 GB of storage space, but you can increase this capacity. Moreover, OneDrive is nicely integrated into Windows. Take advantage of the tips from this article.
Toon van Daele
![]()
For free storage in OneDrive, you can use your Microsoft account at https://onedrive.live.com/about/nl-nl/signin. If you don’t have an account yet, click make an account and follow the instructions. You get 5 GB of cloud storage for files and photos, and for attachments in Outlook.com and Microsoft Teams.
1 Storage management
 |
|
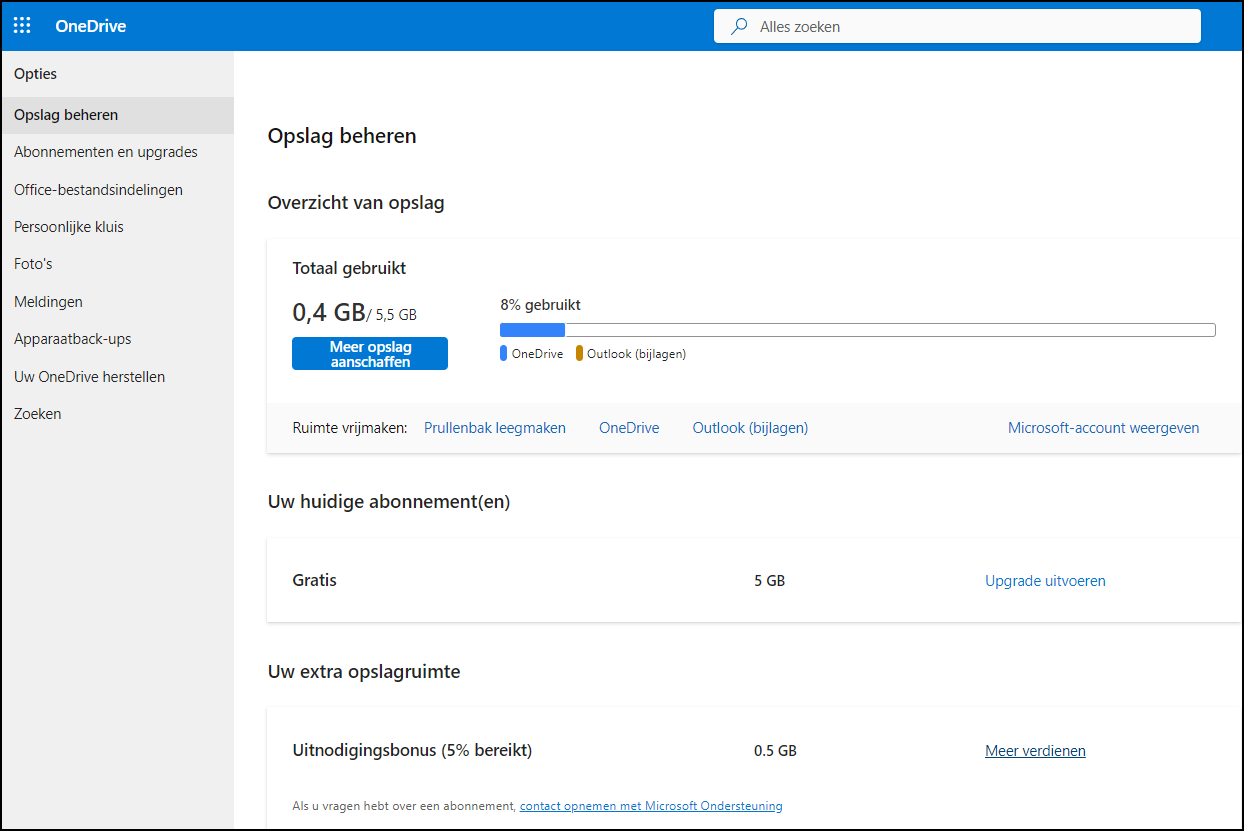
Fig 1. The first one has taken the bait: already 0.5 GB of free storage space |
To see the storage space used, go to https://onedrive.live.com and look at the bottom left (for example 0.4 GB of 5 GB used). Click here for more details, such as consumption within OneDrive itself or via Outlook attachments. To free up space, click Empty the trash and see how much space you can free up by permanently deleting deleted files. Confirm with To delete or click Open trash to choose which data you want to disappear.
For more storage space, click Buy more storage for a paid Microsoft 365 subscription, such as Basic (20 euros annually, 100 GB, OneDrive and Outlook) or Personal (69 euros annually, 1 TB, OneDrive and various Office products). You can also op Earn more click and distribute the link shown. For each new customer who signs in to OneDrive, you and that customer will receive an additional 0.5 GB of space (up to an additional 10 GB) (Figure 1).
2 Windows integration
 |
| Fig. 2. Click on the cloud icon to manage and set up your OneDrive app |
OneDrive integrates seamlessly with Windows. You connect the service to your computer as follows. Go to the Windows start menu and launch the OneDrive-app. Enter the email address of your OneDrive account and click To register. By default, your cloud storage data is synced to the folder C:\Users\
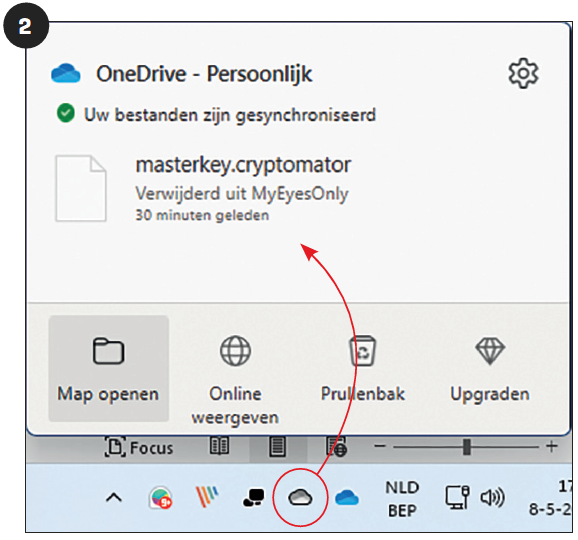
In the navigation bar of Explorer you will see that an additional item has been created: OneDrive – Personal. From this synchronization folder you have access to the online data in your OneDrive. You can follow this synchronization via the cloud icon on the right of the Windows taskbar.
 |
| Fig. 3. File accidentally overwritten? Get it back quickly |
3 Recovery
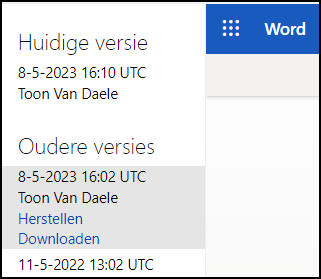
Have you accidentally deleted a file or folder? Then you can easily retrieve it from the Recycle Bin. But what if you overwrote a file? Then OneDrive version management comes in handy. Right click on the overwritten file and select Version history. On the left you will see a chronological overview of the saved file versions. Click an item to view the document contents. You now have two options: To recover (to restore this version) or To download (to keep this version in a different location).
4 Safe
 |
|
Fig. 4. Your personal safe with extra security |
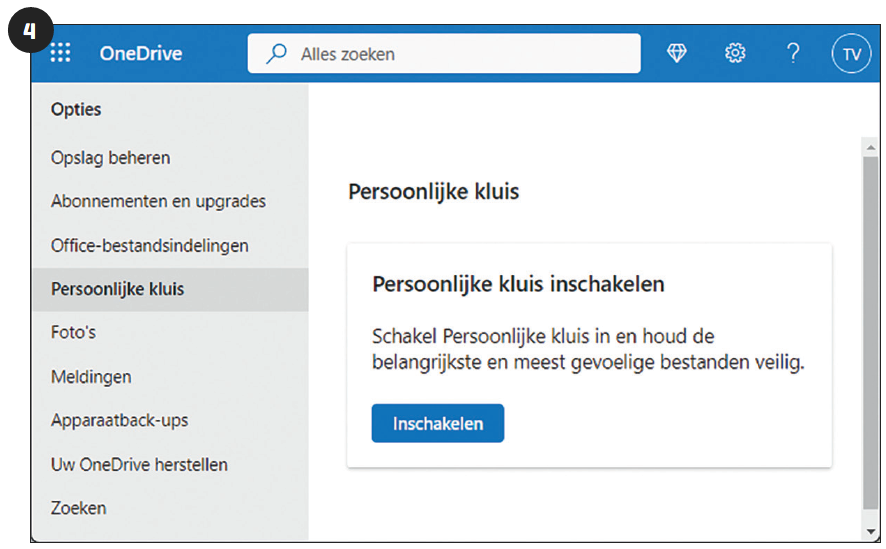
If you store privacy-sensitive data in your OneDrive, you can place it in a folder that can only be accessed with an extra ‘key’, such as a text message or a code. In the free version you can store up to three files in this vault.
To activate it, click on the gear icon in the OneDrive web environment and choose Options. Then open Personal safe and click Switch. Confirm with Understood. You find you Personal safe back via Files. To open it, you must first check your identity – for example, click on Email to
5 Local storage
 |
|
Fig. 5. Prefer local only references or actual files? |
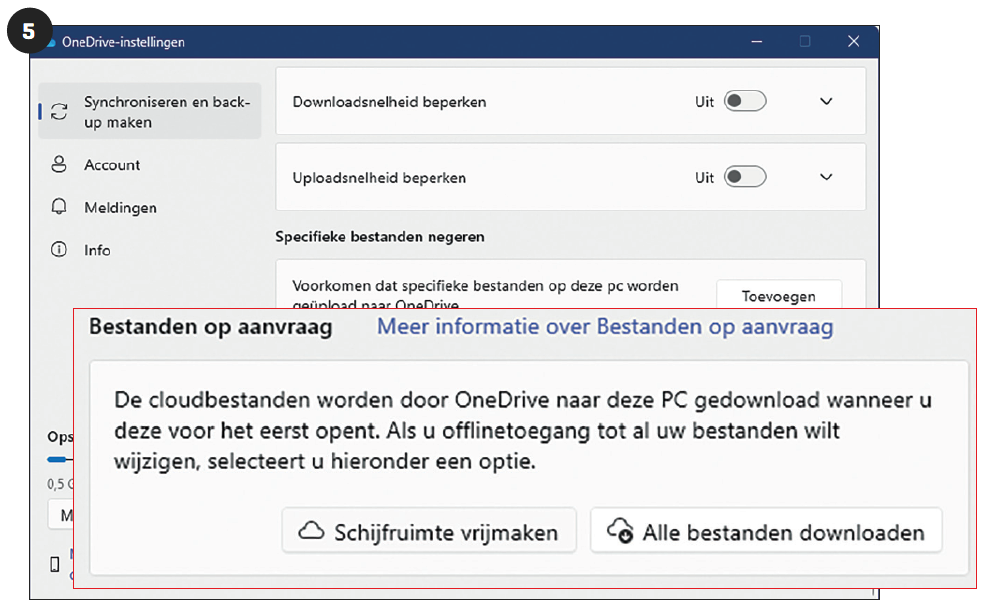
Of course, OneDrive works best if you have set up the local sync app, so that you have your data both locally and in the cloud. This is more secure, but you may want to save on your local storage space. Then simply leave the files in OneDrive in the cloud and download only the files you need.
To do this, click on the cloud icon in the Windows taskbar and then on the gear icon. Choose Settings / Sync and backup and open Advanced institutions. Bee Files on request you click on Free up disk space. In your local OneDrive folder you will still see all the files, but they are just references. Click on a file name to actually download it.
If you would rather transfer all files to your computer, select Files on request than Download all files.
6 Backups
 |
|
Fig. 6. You can let OneDrive automatically select certain local folders |
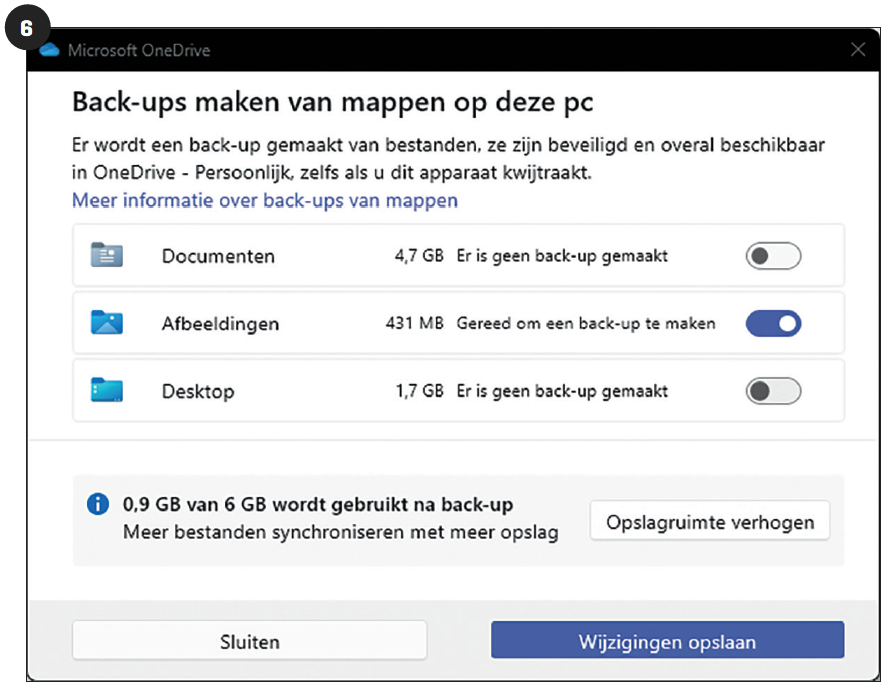
With OneDrive you can not only store and synchronize your online data locally, but also the other way around. You can set the OneDrive app to automatically back up certain folders on your computer to the cloud. Click on the cloud icon and the gear icon and select Institutions. Bee Sync and backup you click on the button Manage backup. Turn on the toggle button for the folders you want to automatically back up to the cloud, such as Documents, Pictures and Desktop. Confirm with Saving Changes. Keep an eye on your OneDrive storage space (see tip 1). You can also disable this backup function here.
7 Group album
 |
| Fig. 7. Share several photo albums with friends or relatives |
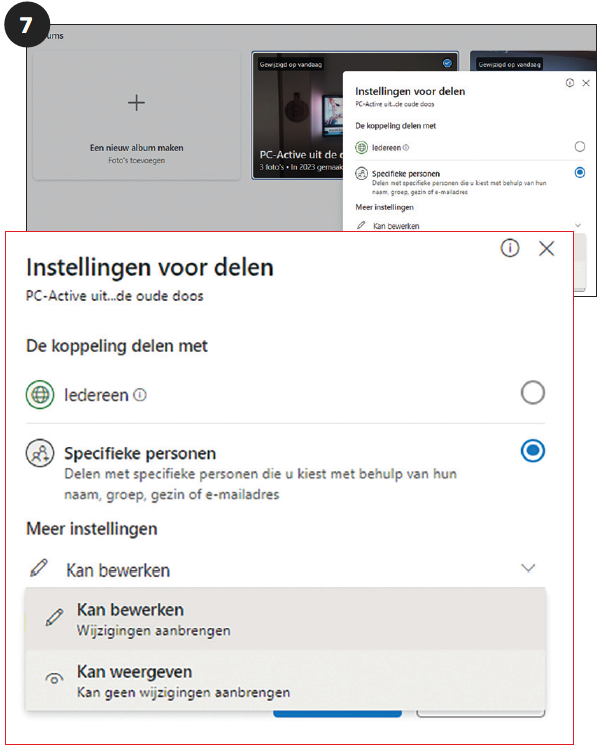
OneDrive automatically organizes all your images in the Photos section. If you want to share photos with specific people, here’s how: Open Photos and go to Albums. Click Create a new album and think of a suitable album name. Confirm with Add photos and select some previously uploaded photos. Click Create Album at the bottom right.
Move your mouse over the album you just created and place a check mark at the top right. Choose To share (top left) and click Anyone with the link can edit. Select Specific persons and choose between Can edit or Can display (image 7). Confirm with To apply and enter the names or email addresses of the intended recipients (with a Microsoft account). Enter an accompanying message and press Send.
8 (Family) group
 |
| Fig. 8. Quick share with your family or other groups |
OneDrive makes it easy to share files with family members or other groups, so you don’t have to enter everyone involved every time. You can first create a group in Outlook for this. For a family, first create a family group by logging in at https://account.microsoft.
com/family/home
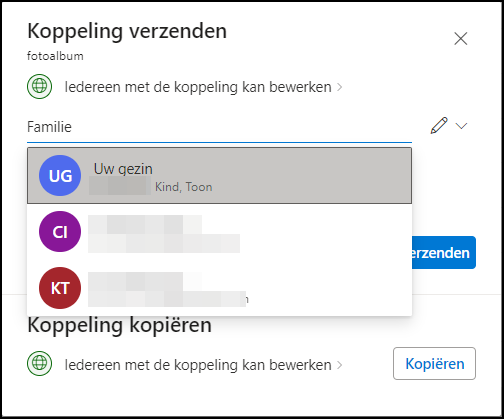
Then log in to OneDrive and choose My files or photos in the left pane. Choose the file or folder and click at the top To share. Choose Anyone with the link can edit if you want to adjust access and edit permissions. In the field Enter name or email addressyou type Family or the name of your Outlook group. Bee Family can you Your family or you select specific family members. Add a message and then send the invitation.
9 Shared folder
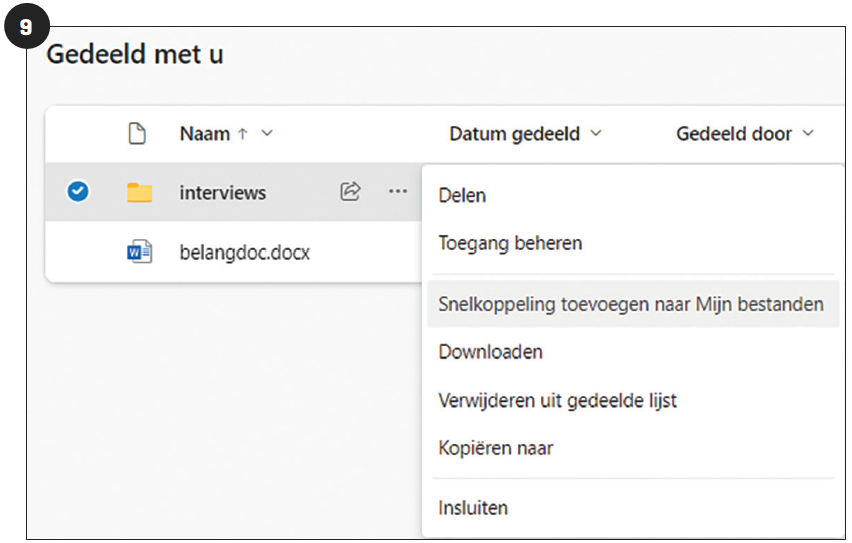 |
|
Fig. 9. Include a shared folder as a link in your own file list |
When someone shares a OneDrive folder with you, you’ll find it in the left pane, below Shared. If you often need this folder, it is useful to include a link to this shared folder in the list My files to record. To do this, open Shared and right-click on the folder. As soon as you Add shortcut to my files selects it, OneDrive creates the folder link. You can recognize this by a blue icon on the folder icon.
10 (Mobile) apps
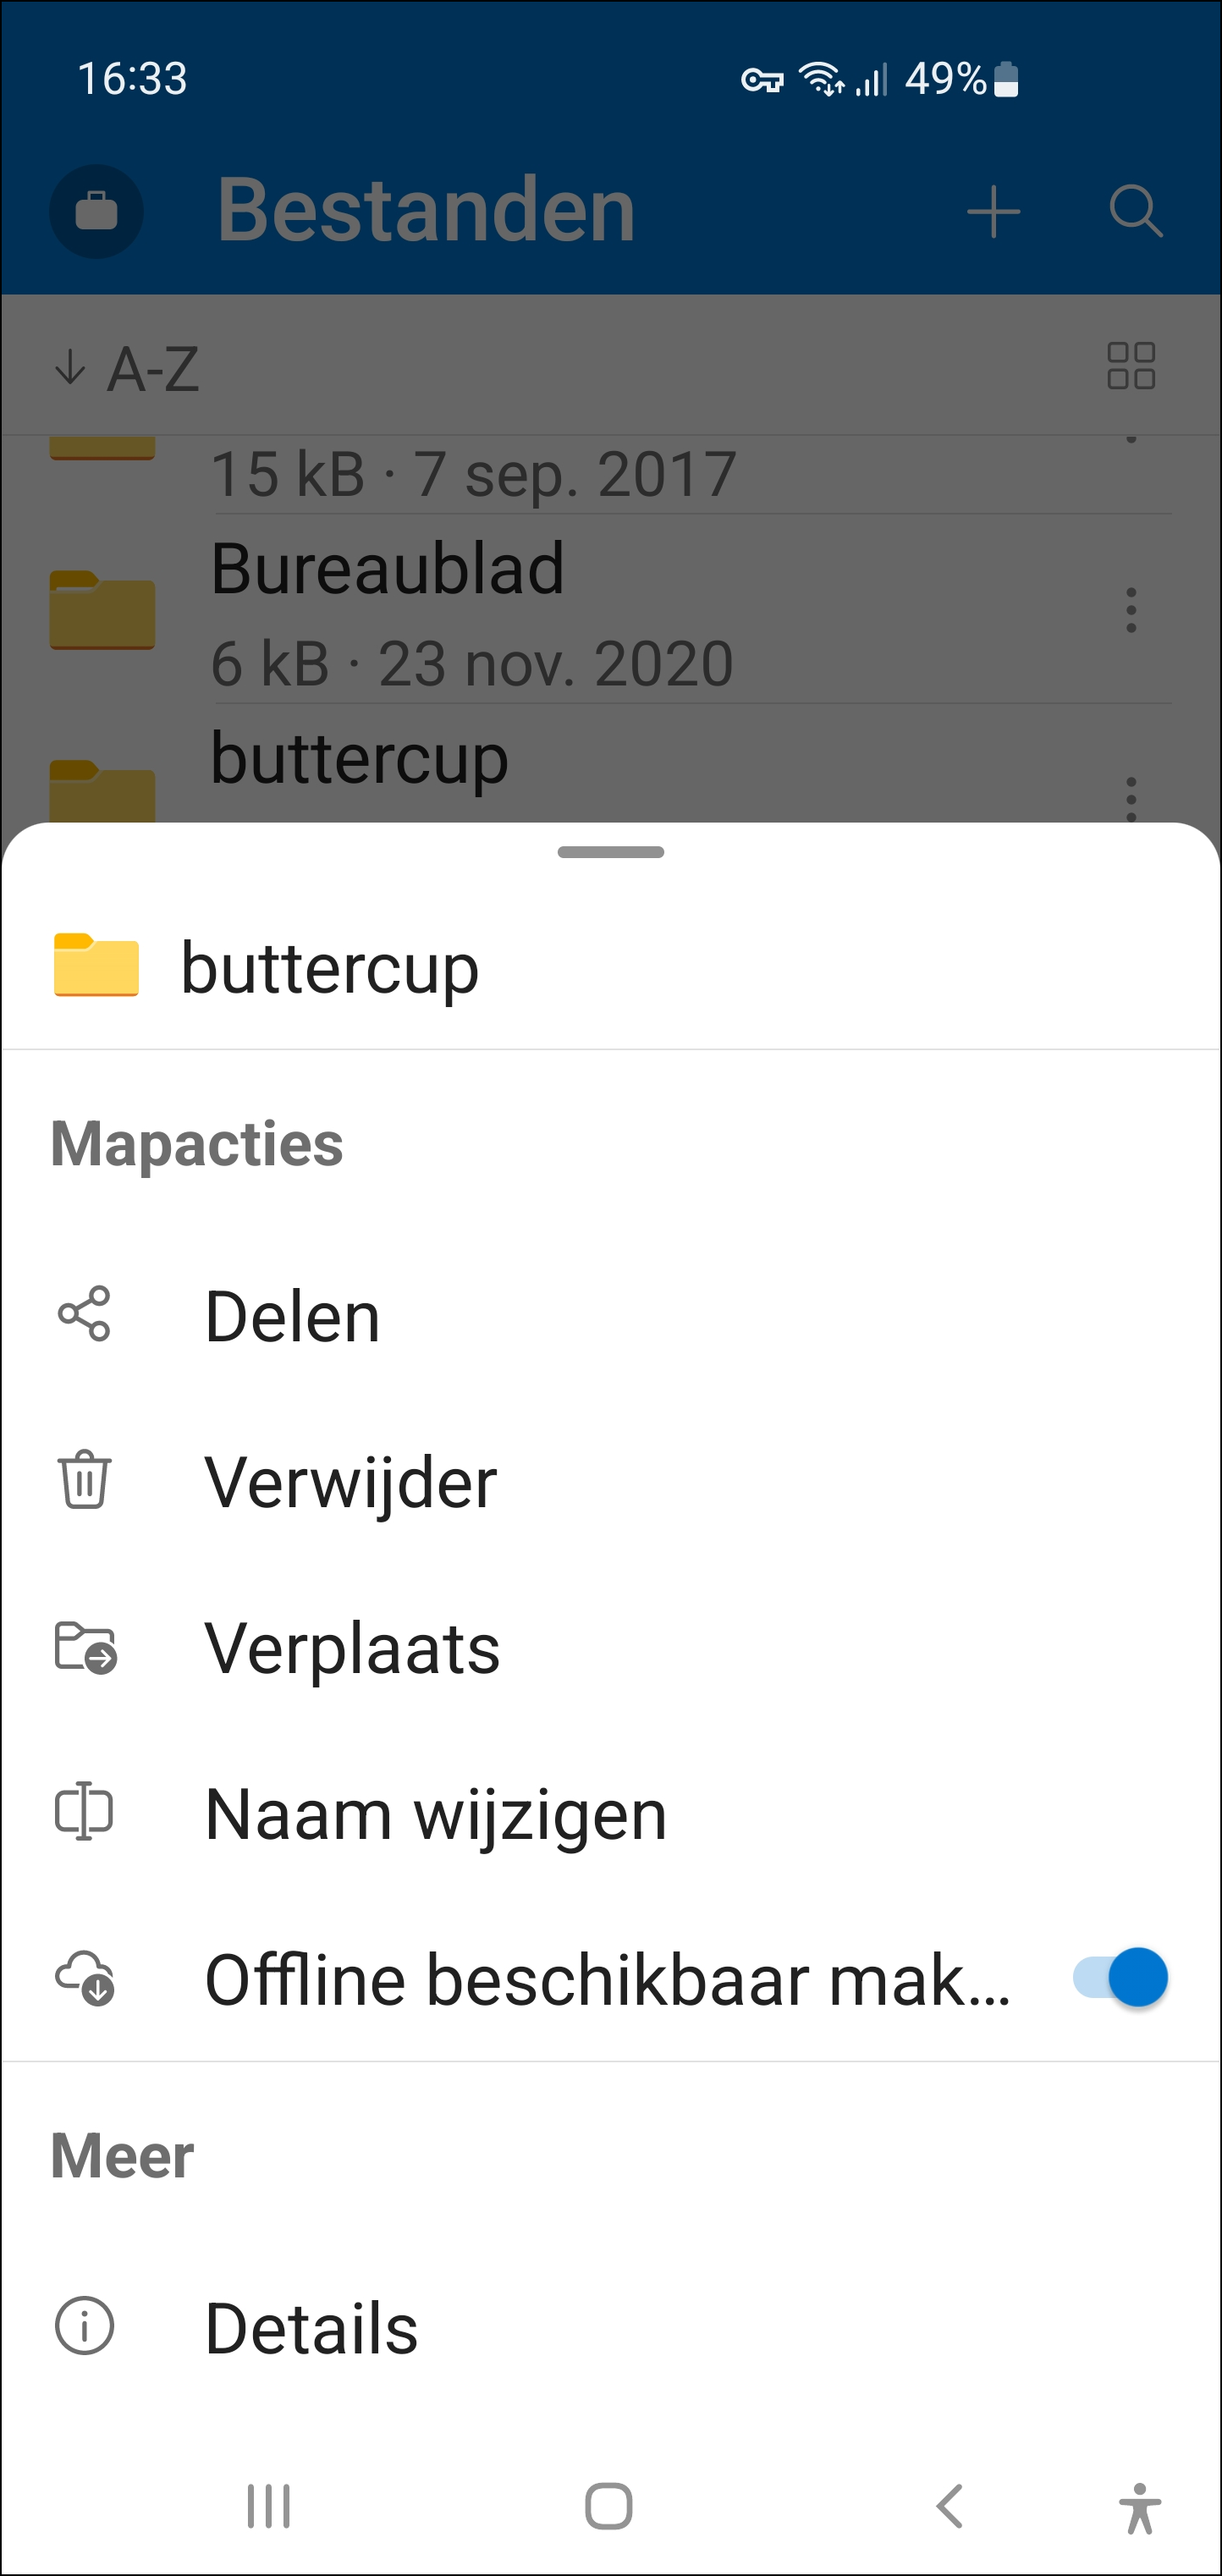 |
| Fig.10. You can also make your online data available offline |
Not only can OneDrive be accessed via the web page or desktop application, but there are also mobile apps for Android and iOS. You can have a download link emailed to you via www.microsoft.com/nl-nl/microsoft-365/onedrive/download
After installation and registration with your OneDrive account, you get immediate access to your online data. By default you see the Recent filesbut to see all data, tap Display all or on the button Files. Tap the button with the three dots next to a folder or file and choose Make it available offline to be able to consult the data even if you temporarily have no internet connection.
.