 Do you regularly scratch your head because you can’t find the right file on your Mac? Then take the time to organize files.
Organize with the Finder
Dealing with files in an orderly manner provides peace of mind and an overview. It prevents a search for the correct file. Making and keeping files organized and accessible is done on the Mac via the Finder. This is the gateway to all information on the computer. Create new folders via the Finder and rename, delete or move folders/files.
In this article, we assume Mac computers with operating systems OS X 10.9 Mavericks or later. If you’re new to the Finder, read the “Mac Computer: Finder” article first.
Create new folder
Overview starts with a clear folder structure. Think in advance which folders you need. Such as folders named ‘Subscriptions’, ‘Money matters’ or ‘Hobby’. You can also create subfolders in a folder. For example, in the ‘Subscriptions’ folder, you will find the ‘SeniorWeb’ subfolder.
Write down the folders you want to create. Then create them in the Finder like this:
- First, go to the Finder. To do this, click the smiley face icon in the Dock
 .
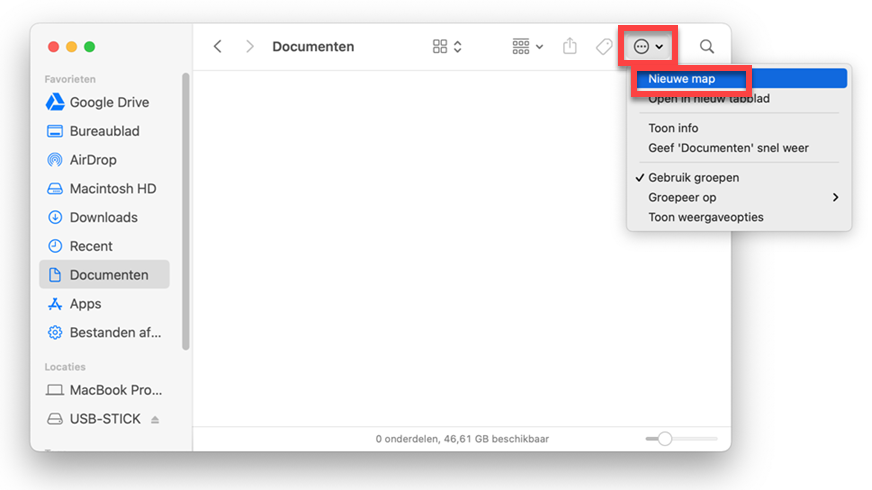
. - In the left pane of the Finder, also known as the sidebar, click Documents.
- The contents of the main folder ‘Documents’ appear on the right. We’ll use this location to show you how to create a new folder. At the top of the Finder, click the circle and three dots icon > New map.

- A new folder will appear. It contains the name ‘Untitled Folder’. Directly type your chosen folder name and press the Enter key.
The new folder has been created. Do you want to create a subfolder? First select the folder where the new folder should be located. Then create a new folder in the same way. Remember that the new subfolder appears in the selected folder.
Rename folders or files
Does the name of a folder or file not accurately describe its contents? Then change the name.
- Click once on the file or folder.
- Click again.
- A light blue box appears around the name. Type the new name and press the Enter key.
The folder or file has now been renamed.
Create video from folder
We demonstrate creating a new folder and changing the name in the video below. The video was shot on a Mac computer running OS X 10.10 Yosemite, but the steps largely correspond to higher versions.
Delete folders or files
You can delete unnecessary folders or files. Do that as follows:
- Right-click on the folder or file.
- click on Move to Trash.
The item is in the Trash. It will stay there until you empty the Trash.
Move files
The Finder allows you to move files to another folder. For example by dragging them to another folder. It is very easy to do this with two different Finder windows side by side. We explain the method in the tip ‘Move files in Finder’.
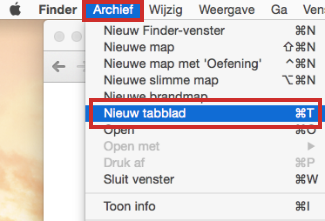
Another option is to open a second tab in Finder and then move a file. This method is useful if you are already good at dragging with the mouse. It goes like this:
- Click in the menu bar at the top Archive.
- click on New tab.

- An additional tab opens in the Finder. In this tab, select the folder where the file should be located.
- At the top of the Finder window, click the first tab. Open the folder containing the file to be moved.
- Click on the file and hold down the mouse button.
- Drag the file to the second tab.
- The tab lights up and opens. Now put the file in the folder and release the mouse button.
The file is in the desired location. This is how you move folders.
Save new file
To keep things organized, always save a new file directly in the correct folder. The method for saving files differs per program. But often it can be done via the menu at the top. It goes like this:
- For example, click Archive > Keep or File > Save as.
- A Finder window opens. Type the file name. This appears after ‘Save as’.
- Click on the arrow you see next to the file name.
- The arrow points up and the window expands. Browse to the folder where you want to save the file. Scroll first in the left pane (the sidebar), then scroll down to the correct folder.
- At the bottom right of the window, click Keep.