Different operating system?
You can use the Explorer to find (‘explore’) the files on your computer. It is the ideal program for organizing and retrieving your documents. How does this program actually work and what can you do with it?
In this article, we’ll discuss File Explorer in Windows 8.1.
- Do you have Windows Vista? Then read the article ‘The Explorer (Windows Vista)’.
- Do you have Windows 7? Then read the article ‘The Explorer (Windows 7)’.
Windows Explorer
The File Explorer in Windows 8.1 differs from its predecessors in a number of ways. The basics have remained the same. If you are already an experienced computer user, you will find it easy to use the redesigned File Explorer. If Windows 8.1 is your first introduction to the computer, this article is a useful starting point.
The principle of the Explorer has remained the same over the years: you use the Explorer to view folders and files on your computer. You can also search for specific folders and files.
In Windows 8.1 you will find File Explorer in the Taskbar on the Desktop ![]() . You can quickly open File Explorer from anywhere with the shortcut Windowskey+E.
. You can quickly open File Explorer from anywhere with the shortcut Windowskey+E.
The window, an overview
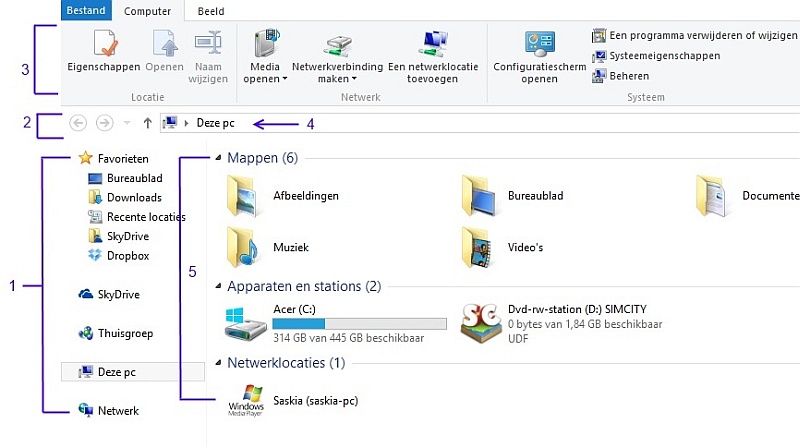
Not much has changed in the Explorer’s appearance. But some things work a little differently than in previous versions. That is why we will now first go through all the window parts. The numbers correspond to the numbers in the figure at the bottom of this section.
- Navigation pane
You use this part of the Explorer to access all your folders and files. - The ‘Back’, ‘Forward’ and ‘Up’ buttons
With ‘Back’ and ‘Forward’ you can navigate between different folders. ‘Back’ takes you to the penultimate folder and ‘Forward’ to a next folder. Up takes you to a parent folder (if there is one). - Ribbon
The Ribbon is new in Explorer. Here you will find frequently used tasks, conveniently grouped. The Ribbon is initially closed, but when you click on a menu item, such as File, Computer, or View, the options that are available appear. - Address bar
In the address bar you can see the path to the selected folder. Click it to show the full path to your files in the opened folder. - The list of folders. Here you will see the folders and later the contents of the folders. You will also see the devices and stations here.
The new Ribbon
So new is the Ribbon, at the top of the Explorer. Here you will find all kinds of tasks grouped together. Which tasks these are depends on the contents of the selected folder. The tabs that you will always find in the Explorer are ‘File’, ‘Share’ and ‘View’. The tabs themselves are further grouped into similar operations.
The Ribbon may not be visible: the Ribbon will be minimized. If you don’t see a Ribbon, click the button Expand the ribbon in the top right corner or press the keyboard shortcut Ctrl+F1.
The ‘Home’ tab in the Ribbon
On the ‘Home’ tab. You will see this tab when you open one of the folders.
 clipboard
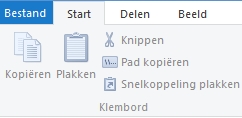
Here you will find five options related to copying and pasting files and folders. They are: ‘copy’, ‘paste’, ‘cut’, ‘copy path’ and ‘paste shortcut’. You won’t use them much anymore because the options under ‘Organize’ are much more convenient.
 Organize
- Move to
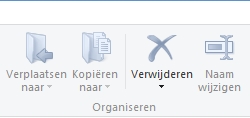
This option allows you to move selected files and/or folders to another location. This is done as follows: click on Move to. You now have the choice to move your selection to the Desktop or Downloads, Pictures, Documents, Music or Videos folder. Most often you will use the last option: ‘Select location’. Click on that and you’ll see a dialog box where you can specify which folder you want to move your selection to. - Copy to
The operation of this button is identical to the previous one. The difference between the two options is that you now keep the selected files and/or folders in their original location. - remove
Click this button to delete selected files and/or folders. - Renaming
You can change the name of a file or folder by clicking this button. Of course, make sure that you have selected the relevant file or folder first.
- Move to
 New
New
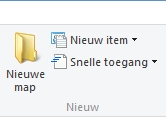
- New map
Creates a new folder within the current one. Press the button New map and then type the name you want to give the folder. Finally, press the Enter key. - The other two options ‘New item’ and ‘Quick access’ are not relevant.
- New map
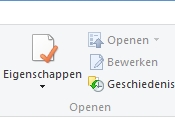 To open
- Characteristics
This gives you an overview of the properties of a file or folder. - To open
Opens a file. The program that opens it depends on the programs you have installed. - To process
This also opens a file. This option is only active if you have installed a program that can open the selected file. - History
This button displays the file history. This is new functionality. This allows you to see previous versions of a file.
- Characteristics
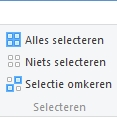 Selecting
- Select all
Selects all files and folders present in the current folder. - Select none
Deselects the selection. - Invert selection
Inverts the current selection.
- Select all
The ‘Share’ tab in the Ribbon
In the ‘Sharing’ tab, you’ll find the following tasks:
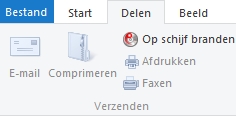 Send
Send
- E-mail
Sends selected files and folders by email. - Compress
Allows you to ‘package’ files so that the file size becomes smaller. You can then send the file compressed, the recipient must unpack the file again as it is called. - Burn to disc
Burns the selected files and folders to CD or DVD (of course you must have a DVD burner in your PC). - Print
Allows you to print the selected file. - Fax
Probably included by Microsoft for completeness, because who still faxes these days?
- E-mail
 The ‘Share with’ and ‘Advanced security’ options are very specific and we won’t cover them now.
The ‘View’ tab in the Ribbon
The ‘View’ tab contains the following tasks:
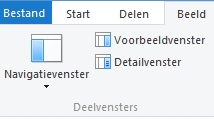 panels
- Navigation pane
Controls the display of the navigation pane (number 1 in the previous picture) - Preview window
This allows you to view the contents of a file, for example a Word document, without having to open a program. - Details window
Makes the file properties visible. They are shown in a separate box on the right. The file properties provide more detailed information about the file, such as the author, the date you last modified the file, and any descriptive labels you may have added to the file.
- Navigation pane
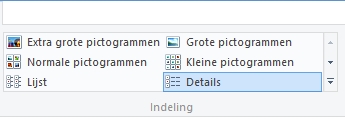 Layout
You can customize the view in the Explorer. You can choose from ‘Extra Large Icons’, Large Icons’, Normal Icons’, ‘Small Icons’, ‘List’, ‘Details’, ‘Tiles’ or ‘Content’.
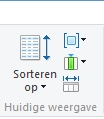 Current display
Here you will find some useful options to help you organize the current view. Click on ‘Sort by’, then select what you want to sort by. You also have the choice between ascending (za) or descending (az) sorting. The three icons next to it further control the display.
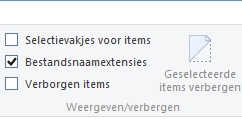 Show/Hide
Here again you will find a few options for the display . If you check ‘Check boxes for items’, boxes will appear for each file and folder that you can check and uncheck. This makes it easier to see which files and folders you have selected. Check ‘File name extensions’ and you will not only see the names of the files but also their endings (so for example ‘Testdocument.docx’). And check ‘Hidden items’ if you want to make hidden files visible.
 Options
Click on options to activate the ‘Options’ window. In this window you can adjust the default behavior of the Explorer.
The Alternating Tab in the Ribbon
The tabs ‘Home’, ‘Share’, and ‘View’ can therefore always be found in the Explorer. But there may also be a tab that depends on the type of file. When you click on a photo, music, or video file, this tab appears.
- Pictures
The ‘Manage’ tab appears for images. Above it, you’ll see “Picture Tools” in yellow.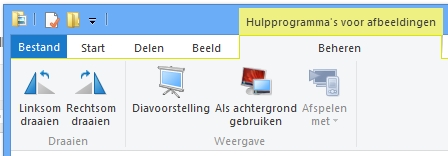
The following options are provided:- Turn left
Tilts the image 90 degrees to the left. - Turn clockwise
Tilts the image 90 degrees to the right. - slideshow
Start a slideshow with the selected images. - Use as wallpaper
Sets the selected photo as the desktop background. - Play with
Only applies if you own another device (such as a tablet).
- Turn left
- Music
If you select a music file, the ‘Play’ tab will appear. Above it you’ll see ‘Music options’ in yellow.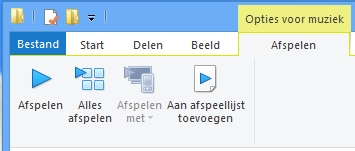
The following options are provided:- Play
The selected music file is started. But don’t be alarmed: the Music app opens and plays the music in it! If you want to stay in the Explorer, choose the last option: Add to playlist. - Play all
All existing music files in a folder are played. Again, the Music app opens here. - Play with
Only applies if you own another device. - Add to playlist
The selected music files are played in a small music player. You just stay in the Explorer. And you can save the list for later use.
- Play
- Video
If you select a video file, the ‘Play’ tab will appear. Above it, you’ll see “Video options” in light pink.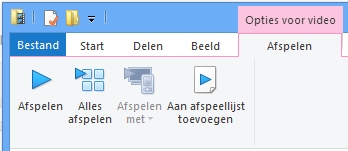
The following options are provided:- Play
The selected video file is launched. - Play all
All existing video files in a folder will be played. - Play with
Only applies if you own another device (such as a tablet) - Add to playlist
The selected video files are played. But you can save the list for later use.
- Play
Folders and Files (and Libraries)
A file is an object on your computer. It can be anything: a music track (eg MP3), a text file from Word, a photo you took with your camera. Files can contain anything, but they have two things in common:
- All files have a unique name.
- All files are stored in a folder on your computer.
A folder is nothing more than a repository where you can store files. And from Windows 7, the Explorer also has ‘Libraries’. You do not need to know exactly what this means, it is important that you know that in the ‘Libraries’ folder you will find four personal folders:
- Pictures
By default, this folder is used to store your digital images. - Documents
This folder is used by default to store your Word documents, worksheets, presentations and (usually text) files. - Music
By default, this folder is used to store all your digital music files. - Videos
By default, this folder is used to store videos, such as video recordings made with your digital camera or camcorder.