You can use the Explorer to find (‘explore’) the files on your computer. It is the ideal program for organizing and retrieving your documents. How exactly does this program work and what can you do with it?
Different operating system?
In this article, we’ll discuss File Explorer in Windows Vista.
- Do you have Windows 7? Then read the article ‘The Explorer (Windows 7)’.
- Do you have Windows 8.1? Then read the article ‘The Explorer (Windows 8.1)’.
What is the Explorer?
In Windows Explorer, you can see the files, folders, and locations on your computer. Windows Explorer lets you find, copy, and move files and folders, and rename files and folders. For example, you can move a document from one folder to another folder.
Where can I find the Explorer?
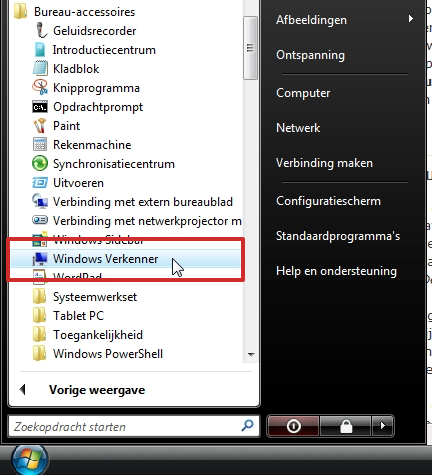
The File Explorer is ‘hidden’ in the Start menu. Click with the mouse on the button Start, then choose All programs and then desk accessories. You see the Windows Explorer standing in between. Click on it to open the program.

To place a shortcut to File Explorer on your Desktop, right-click on Windows Explorer. Then you choose Copy to…Desktop. The shortcut will be placed on the Desktop, and from now on you can open File Explorer from there (it’s that easy).
Using the keyboard shortcuts Windows Key+E, you can start the Explorer even more easily. Press the Windows key and the E key at the same time and the Explorer will start.
Appearance of the Explorer
The Explorer opens the folder by default Documents . You will see two split screens. On the left is an overview of the folders on your computer. On the right you can see the contents of the selected folder. You can double click on files in the right pane to open them. Want to look up something from another folder? Then browse to the relevant folder in the left window. You will then see the content appear on the right.
At the top of the Explorer you will see the menu bar, with the options File , To process , Image , Additional and Help . We will discuss these later in this article.

The menus
In addition to viewing and browsing files, File Explorer lets you add new files, rename them, and more. You can arrange this with the menus at the top of the menu bar. The procedure is always the same: in the main window, navigate to the desired folder or file. Then select the folder/file and use the menus at the top for further actions. We now go through them one by one.
File menu
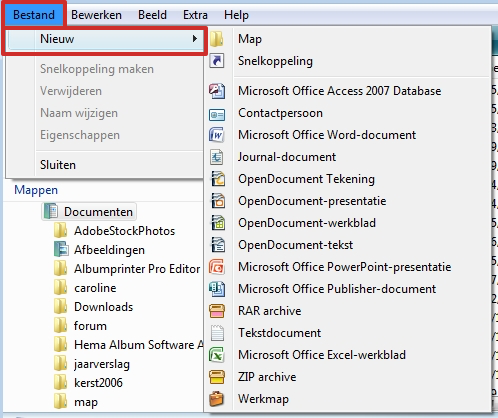
If you have selected a particular folder in File Explorer, you can access it from the menu File add new files. For example, to add a new Word document to My Documents, navigate to this folder with File Explorer. Then click File > New.

You then choose the desired file type, in this case Word document. You give it a name, and voila: the new file is added. In this way you can also create subfolders in My Documents, or in other folders.
You can also delete or rename selected files here.
Edit menu
Using this menu you can delete files, copy them, select the contents of an entire folder, or invert the selection. Be careful what you throw away: you should of course know how to throw away your personal documents, but it is better not to mess with system files or parts of Windows. To copy a file, select it with the mouse and choose Copy from this menu. Then navigate to the destination, and select To stick from this menu. The file you selected will now be copied to the destination location.
Menu Picture
This is a very useful menu. The option Toolbars expands the number of toolbars in the Explorer. This can be useful, but is not necessary. A check mark for the option status bar conjures up an extra bar at the bottom of your screen, containing information about the number of objects in the folder you selected.
The other options in the View menu are also useful. For example, you can specify whether you want to see details of the file names, or rather thumbnails (icons) of the files. If you are viewing photos that can be useful, what exactly can be seen in an image can often not be deduced from the file name. Icons allow you to see small representations of the images. Again, you can experiment with which view you like best.
You can also indicate here whether you want to sort the icons (or folder contents) by, for example Name or Type .

Menu Tools
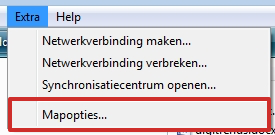
The most interesting part of this menu are the Folder options.

This allows you to determine how you want the files to be displayed and which files you will and will not see. Scroll through the three tabs (General, Display and File types) and see what the options are.
Help menu
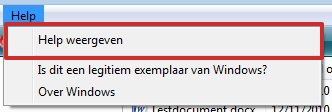
The Help menu opens the Windows Help and Support. By default, Help opens with information about “Folders.”

Standard buttons (1)
You will also find the standard buttons in the Explorer, which you can see on the right.
Use the arrow buttons to move to the previous or next folder. You can quickly search for files in the search box.

Standard buttons (2)
Under the buttons Organize and Image you will find options that can also be found in the main menu. Handy to the View button is that you can quickly change the layout of a folder. With the button To burn you can copy the contents of a folder to DVD or CD-ROM.
Now you are aware of the most important parts of the Explorer. View them at your leisure and discover their many possibilities!
