Windows Media Player makes it easy to manage, organize and listen to music and videos in Windows 10.
Background information
With Windows Media Player 12 you can easily manage and organize music and videos. It is also a piece of cake to download music from CDs. Open the program. Next to the Start button, click the magnifying glass and type: Windows Media Player. Click on the app.
The appearance
Windows Media Player 12 is very clear. The program is divided into several windows. Let’s take a look at the parts.
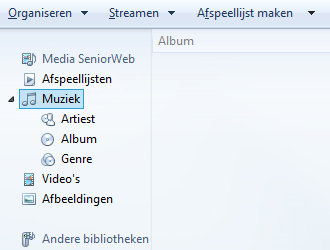
- At the top are the three buttons ‘Organize’, ‘Stream’ and ‘Create Playlist’. If you click on the arrow next to the buttons, a corresponding menu opens.
- The Navigation pane is on the left. From this place you will get to your music, videos and pictures and TV recordings. The files correspond to the files you will find in the ‘Music’ folder. To be opened via the Explorer.

- If you select a folder in the left pane, your files will appear in the middle.
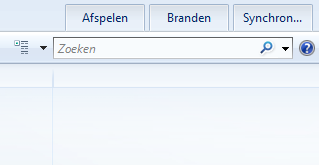
- On the right is a window where you can view the current playlist (“Play”), burn a CD (“Burn”) and transfer music to an MP3 player (“Sync”). Unfortunately, the latter cannot be done on an Apple iPod.

- At the bottom are the buttons that control playback.

Add items to the media library
The media library is the beating heart of Windows Media Player. This is where you manage and organize your music collection. By default, the program places all music from the ‘Music’, ‘Videos’ and ‘Pictures’ folder in the media library. When you add or remove files, the Windows Media Player media library is automatically updated.
Do you also store files in other places (than the Libraries) that you want to have available in the Media Player? Then specify those locations in Windows Media Player:
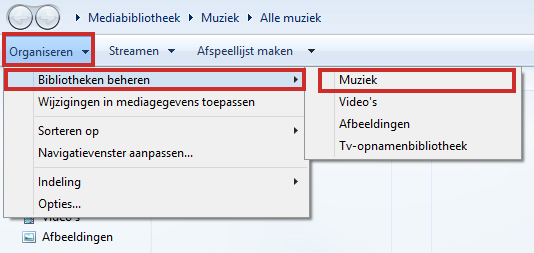
- click on Organize > Manage Libraries.
- Click the type of file for which you want to specify a different location. For example Music.

- An overview opens of folders where the files are already retrieved. Your desired location should not be listed yet. click on Add.
- Navigate to the folder where the files are located and click Record folder.
- Repeat this step for each (root) folder you want to add.
- click on OK to exit the menu.
Transfer CDs to PC
You probably still have a collection of music discs. Then it is nice to also have this CD collection digitally available on the computer. Then you can also create your own playlists and burn them again as a music CD. Transferring audio CDs to the computer is called ripping. In Windows Media Player this is done as follows:
- Make sure you are connected to the Internet. Windows Media Player searches the Internet for information about the CD, such as the artist, the title of the album and a picture of the cover. That information is added so that you can easily find the CD in Media Player later.
- Insert your CD into the computer’s CD player.
- A track list appears in the center window, and the CD title appears on the left side of the navigation pane. An extra button has also appeared in the menu: ‘Rip CD’. click on rip CD.
In the window in the middle you can see under ‘rip status’ per song how many percent has already been transferred to the computer. When the process is finished, the CD is on the computer and you can find the songs under ‘Music’.
Browse your music collection
You can browse your music files in the following way:
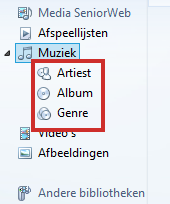
- On the left side of the navigation pane, click Artist, Album or Genre (if you don’t see this, click on the arrow for Music).

- In the middle you will find an alphabetical overview of your files.
Tip: you can adapt this overview to your own wishes. Click on the arrow next to the ‘Show options’ button to the left of the search bar (at the top). You will then be presented with three display options: Icon, Side by Side and Details. You may be familiar with these display options from the Explorer. Windows Media Player remembers the selected setting per component. So you can change the view ‘Set Artist’ differently than with ‘Album’.
Search and find items
You can easily search within Windows Media Player.
- In the navigation pane (left), click the item you want to search. For example Music or Videos.
- In the search bar at the top of the screen, type your search term.
- As soon as you start typing, the search results are shown in the window in the middle.
Playing music
Double click on an album or song to play music. If you want to play several songs in succession, drag these songs to the right in the ‘Play’ window. At the bottom, the blue bar shows the progress of a song. You have the following buttons from left to right that allow you to control the music:
- Enable Shuffle: Click to play the music in a random order.
- Enable repeat: Click to restart the music after a song or playlist is finished.
- Stop: Click to stop the music.
- Previous: Click once to go to a previous song. Hold down the left mouse button to rewind a bit in the current song.
- Play/Pause: Click to start or pause a song.
- Next: click once to go to the next song. Hold down the left mouse button to fast forward a bit in the current song.
- Mute: Click to turn the sound off completely, click again to turn it back on.
- Volume: Use the mouse to slide the volume up or down.

All these buttons also work for videos. Open a video by double clicking on it. The video plays in full window. Click the Windows logo icon with an arrow  to go back to the library.
Create playlists
You can create playlists in which you put together your own music and/or video set.
- Click on the top left Create playlist.
- A new playlist appears on the left side of the navigation pane. Click there and type a name for the playlist.
- Press the Enter key.
- Navigate as usual to music (or videos) you want to put in the playlist.
- From the center panel, drag an item (such as a song) to the playlist in the navigation pane. Dragging is done by clicking on an item and holding down the left mouse button while moving the mouse to the playlist. Release the mouse button when a plus sign appears.
This way you can create different playlists. You can add items to each list later. You can also delete an item by selecting it (clicking on it) and pressing the Delete key on your keyboard.
Burn CDs
With Windows Media Player you can also burn your music to a CD, after which it can be played in a CD player. You can read how to burn CDs with Windows Media Player in the article ‘Burn music CDs with Windows Media Player’.