Your own stickers or avatars are becoming increasingly popular. You can also make and use them in Whatsapp and in this workshop you can read how to do that.
![]()
Rob Coenraads
The Avastars program is not yet a success at the time of writing this article. Avatars or personalized stickers are: you come across them more and more. With your own avatars aka personalized stickers you can show how you feel and you can use one for your profile picture. Read in this workshop how to create and use your own avatar in Whatsapp.
|
1. Settings Open the WhatsApp app on your phone or tablet, click on the three dots at the top right of your main screen. Then click on Institutions and choose the option avatar. Then click on Create your avatar and finally on To work. 4. Lots of options Now move on to the many subsequent options by choosing an option to the right of the selected option each time. This is how you choose one first Outfits and Body, after which you get to work with your face. This is where you decide Eye shape, Eye colorr and whether or not you Eye makeupwant up. Next are you Eyebrows turn and also its color. With this option there are even Bindi’s (dot on your forehead) available. Next is you Nose turn (and possibly Nose piercings), you Mouth where you can choose one Form and the Fullness (Thin or Full). After that you face shape next, among other things Face markings like freckles.
5. Almost done Well, a lot has been thought of, even Hearing aids but also on Headgear. You can even digitally pierce some parts if you want. When you have made all those choices, click Finished. And you almost are. But not quite yet!
8. Profile picture And of course you can also set your avatar as a profile picture. All you have to do is choose a pose and a background, click the check mark at the top and wait for your avatar to load.
|
2. Create your basic avatar To create your avatar, you start with your so-called basic avatar. Choose a skin color for this. As with the following steps, you can stay close to reality or choose something completely different for once. After this, the basic avatar appears and you can really get started.
You can now enjoy yourself with all the options. You can see that the screen is logically arranged: at the top how you will look, in the middle the options and at the bottom the examples of the options. You can choose from many examples by scrolling down scroll. I find it less logical that there is at the top right Finished condition: at first I thought I should choose this one if I chose an option. But by clicking on this, you determine that you have completed your avatar and, of course, you are not there yet in the beginning.
7. Stickers with message
|
|
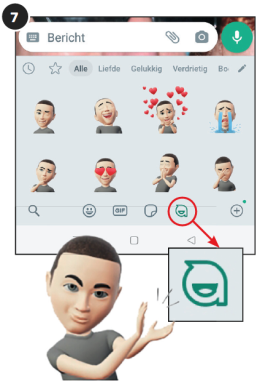 If you want to send one of your created and therefore personal stickers in a Whatsapp message, first click in the text box (in which Message stands) on the smiley/emoji on the left. After choosing the symbol