An iPhone and our tips is all you need to make great videos.
Member BenefitThis article comes from the latest MacBook 2023, which includes 17 creative and practical projects in the categories Mac, Photos/Video/Music, Creative and Handy. As a HCC member you get a hefty discount on this.. Look here. |
|||
Editorial
The times when we walked around with a clumsy camcorder are (fortunately) long gone. Nowadays, with your iPhone you always have a great film camera at hand, with which you can record everything in detail. It is often even much better at filming than your full-fledged SLR or compact camera. At least, provided you know what you’re doing, because even with all the advanced camera technology in the iPhone you regularly see videos passing by that still look like they were made with a camcorder. And that’s not a compliment. With the tips on the following pages, you’ll learn how to get the most out of your iPhone camera and take your footage to the next level. This way you will make a splash with your (summer) film.
Filming for beginners
With these 6 basic tips you can immediately make better film images with your iPhone.
1. Keep it horizontal Vertical videos have become commonplace since the iPhone. But on all other screens – TV, MacBook or even the cinema – they look pretty dull. Therefore, always try to film horizontally. An exception is if your film only appears on Instagram, TikTok or Snapchat, but even then it is better to turn your phone a quarter turn for the future-proofing of your video.
2. Stabilize Your iPhone has built-in stabilization that stabilizes your images. That is very useful, but this technique does not work wonders: if you hold your iPhone with one unstable arm far from your body, your images will still be very jerky. So grab your phone with both hands and keep your elbows against your body to stabilize your iPhone while filming.
3. Shorter is better  Are you going to a concert and want to capture it properly? Go for atmospheric images! Film a short piece where you film the stage and the audience and then put your iPhone away again. Filming the entire concert might seem like fun for later, but you’ll probably never watch it all back – let alone your family and friends. This almost always applies when filming with your iPhone: short and sweet is better to hold your audience than long and boring.
4. Space Film images take up a lot of space. Keep this in mind, and check before you head out Institutions > General > Info how much storage you still have available. Are you tight and don’t know what to remove? Then enter Settingsn to Camera > Record video and select a lower quality that takes up less space. You can see under your options how much storage a minute of filming takes up: this varies from 45 MB per minute to 440 MB per minute. We do, however, advise you to free up space rather than lowering the quality. If you don’t film in 4K, there is a good chance that you will regret this in the future.
5. Choose your lens If you have an iPhone with two or three lenses, you can choose from the Cameraapp with which you film. Depending on your iPhone model, you can choose from 0.5x (ultra wide angle), 1x (wide angle) and 2x/2.5x/3x (telephoto). The wide-angle lens is the most technically advanced camera on your iPhone and therefore always produces the best film images. The ultra-wide-angle lens and telephoto lens offer less high image quality and only film really sharp in good light. By the way: with an iPhone without a telephoto lens, zooming in gives blurry images, because then you actually only cut in the camera image. So only zoom in with Pro models, the iPhone X(s), iPhone 8 Plus or iPhone 7 Plus.
6. Choose your frame rate The frame rate or fps is the number of frames per second. The more images, the smoother. You have Institutions > Camera > Record video three options: 24, 30 and 60 fps. 24 is the speed of feature films, 30 is the standard for Internet videos (and usually the best option), and 60 is common for sports videos. Whatever you choose, always use the same frame rate for your entire movie.
|
In principle, you can make good film images with all iPhone models since the iPhone 6s (Plus) from 2015. However, the newer the model, the better your film quality. You notice this especially when it comes to the dynamic range: newer iPhones show more detail in bright sunlight or dark shadows, while older models tend to over or underexpose images. The ultra-wide-angle lens and telephoto lens in newer models also give you a little more flexibility when filming. |
|
A. |
|
|||
|
B. |
C. |
D. |
Playing with perspective
Your iPhone is so quickly taken out of your pocket that it’s tempting to quickly open the Camera app and shoot haphazardly – especially if you’ve already set all your settings correctly with the tips on the previous pages. Still, it is better to first think about what exactly you are capturing. If you know that you will later make a montage of several short film images, it is useful to think about what your timeline is. For example, are you going to film a day at the beach? Then take pictures of the way there, the people you are with, that one place where you are going to eat and come up with a nice final shot. This way you have a demarcated set of videos with a story that is easy to follow.
In addition to coming up with a timeline in advance, it is also important to think about what your images should look like. Because although it may seem simple to film something with an iPhone, it is secretly quite an art to film it well. Where should your subject be? At what height should the horizon be? How close or far should you film? There are all kinds of rules for composition that ultimately make your images look a lot more pleasant if you stick to them. We list them for you.
1. Rule of thirds
The most essential rule of thumb for the composition of your images is the so-called rule of thirds. This divides your image into nine areas by means of four lines that intersect. You can see this on the camera image of your iPhone if you have enabled the grid in ‘Settings>Camera’.
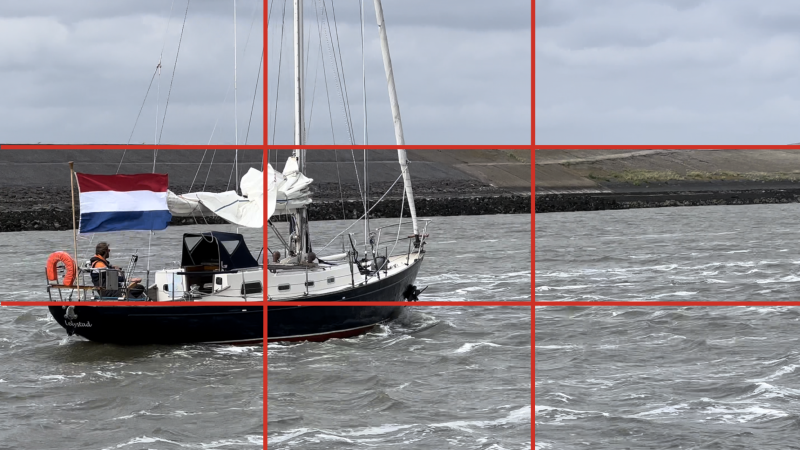
The idea is that you place the key elements of your shot along the lines, or at the intersections of the lines. This should provide a more interesting image than if you film very symmetrically. Above you see an example of this: we place the horizon on the upper horizontal line, and the center of the sailboat on an intersection of two lines. The rule of thirds can also be applied to photos: so always leave your grid on!
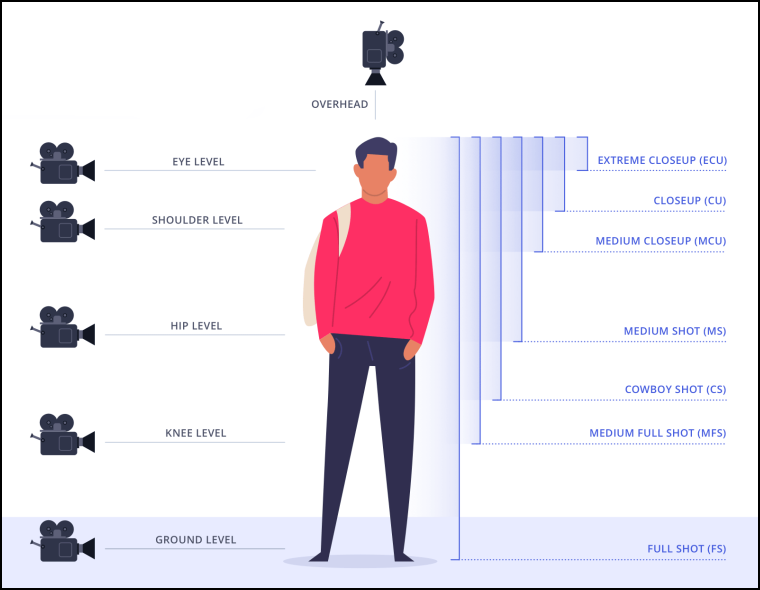
shotsBy moving closer or further away from your subject – or switching between your iPhone’s lenses – you can get all kinds of shots, from extreme close-ups to full shots. In the example you can see what they look like. Basically you use close-ups to show emotions and details, medium shots to film conversations, and full shots to get a good picture of your subject and the environment. If you take a step back and your subject is small in the frame, you arrive at the so-called ‘wide shot’. The environment is more important than your subject here. By combining the different types of shots and using them at the right time, you keep your video interesting.
|

2 Rule of space
While filming, it is important to give your subject enough space. If we had not made a space on the right side of the above image of the sailboat, you would have no idea of where the boat is going. This would make the frame less interesting, and it (subconsciously) gives the viewer a more enclosed feeling. The rule of space is also important when filming people: if someone looks in a certain direction, leave space in that direction.
3 Main room
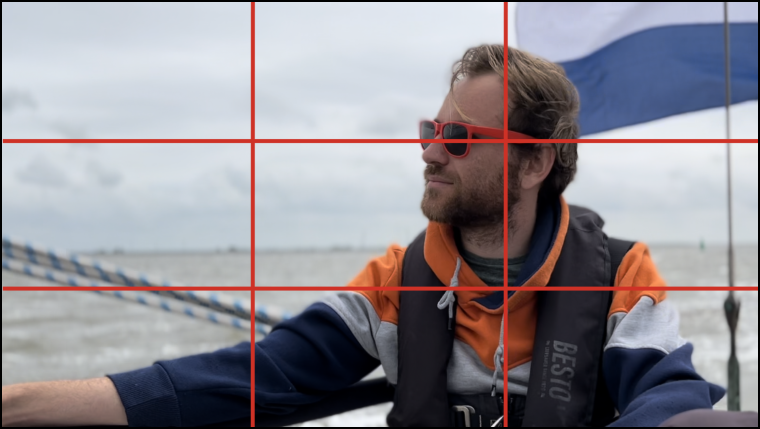
When filming people, headroom also plays a role in addition to the rule of space. This means that the top of the head should not be too close to the top of your frame – but not too far from it either. Use the rule of thirds again for this. Are the eyes level with the top horizontal line? Then you’re good.
Are you going to film someone up close and is the top of the head not visible, like in a spaghetti western? You can, but try to place the eyes on the intersections of the top horizontal line and the two vertical lines. This leaves enough space on the side of the face, so that you comply with the space rule.
4 Movements
You can easily point your iPhone in all directions while filming. Left, right, up, down: everything is possible, but it is important to do your movements in moderation. It is more pleasant for the viewer if each shot has one head movement, such as a shift from left to right, a smooth rotation, or following your subject. Also remember that it looks more pleasant if two shots in succession do not have an opposite movement: if you move forward in one image, it will feel unnatural if the next image moves backwards.
PerspectivesOften we tend to film at eye or shoulder height: that’s where you hold your iPhone, after all, and it feels natural to look at. But the nice thing about filming is that you can play with it quite a bit. You can hold your iPhone closer to the ground or completely above your subject: because it is so light and small, this is very easy with an iPhone. Play around with this, and your film will soon feel less sterile.
|