
Do you work behind your PC with a keyboard and mouse? Or do you use the touchpad of a laptop? Great of course, but problematic if your mouse suddenly fails, or (even more annoyingly) if you experience problems with your hand, wrist or arm. Then it is good to know that you can do almost everything on your computer without a mouse! How? We show you.
1 Mouse or keyboard?
In this workshop we will do as much as possible with the keyboard. Not everything is always faster with the keyboard, some functions are hidden deep in menus and do not have a fast key combination. In principle, almost everything is accessible via the keyboard, but sometimes you have to take such a detour that the mouse is faster. Oh, and take a good look at your keyboard: on some keyboards there is a button somewhere to call up the right-click menu (under an fn function or right next to the Space bar).
2 Start Word
Our mission in this article is to create a Word document, save it to a folder and then compress this document together with some images (which we have already made) into a zip file. We then want to e-mail this zip file to someone, after which our task is over and we shut down the computer.
Of course you can do a lot more on your PC, but this task contains so many different things that it is representative of many tasks that the average user would like to perform. We start with Word. You do this on the Windows button, and then in the start menu Word to type. If all goes well, Word is already automatically selected, after which you immediately get up Enter can press to start the program. If more options are shown, you can navigate to the Word icon with the arrow keys.

3 New document
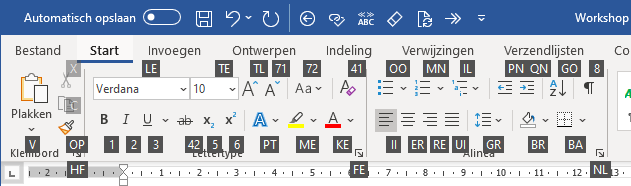
Now that Word has started, we can create a new document. It may be that a blank document is immediately on screen, we naturally want to show that every option can be reached via the keyboard. You create a new document by using the key combination Ctrl + N to press. If you have multiple documents open, then you probably want to be able to switch between these documents. You do this in the same way that you switch between program windows, namely with the key combination Alt + Tab. You can easily activate all parts of the ribbon using your keyboard. Just press Alt, then you will see numbers and letters appearing at the different parts of the ribbon. With such a number or letter you go directly to the right place.
4 Select and more
You will be able to type text in Word. It may become more problematic if you want to select pieces of text to do something with them. You may already know the key combination Ctrl + A, which means that you select all the text in a document. Stand at the end of a sentence and press Ctrl + Shift + Arrow Up, then select the entire paragraph. With Ctrl + Shift + Arrow Left select the word on the left of the cursor (and with the right arrow of course on the right). The combination Shift + Home selects the part of the cursor to the beginning of the line. Shift + End selects right to the end of the line. With Ctrl + Shift + Home select everything from the cursor to the beginning of the document, and with Ctrl + Shift + End so until the end of the document. If you only hold down the Shift key, you can select text at the letter level. To copy or cut text and paste it elsewhere, you naturally use the famous key combination respectively Ctrl + C or Ctrl + X, and after that Ctrl + V.
5 Layout
Adding layout to your document with key combinations is fairly easy. To make a text bold, use Ctrl + B (the b from bold). You can do this when you have selected a piece of text, or you can activate bold and then type text. You can switch this function off again with the same key combination. With Ctrl + I (the i of italic) make your text italic and underline with Ctrl + U (from underline).
It becomes more difficult if you want to add headers. To do this, select the text to which you want to assign the Header profile, for example. Press Alt + R for the Start tab, and then on S and on N to move the cursor to the Styles section. You can now scroll through the styles with the arrow keys, only when you are on Enter are really applied. Do you want it even faster? Ctrl + Alt + 1 apply cup style 1, Ctrl + Alt + 2 header style 2 and so on.
6 Add content
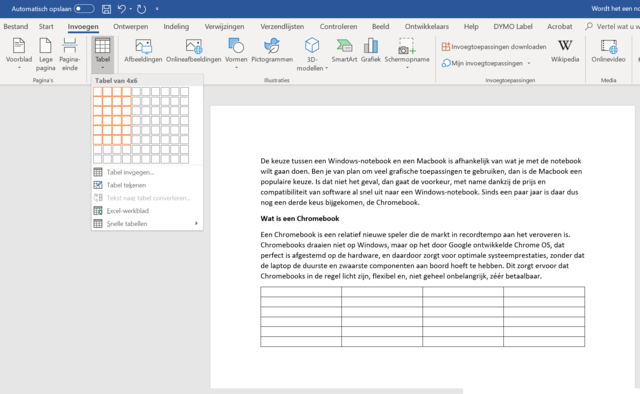
You can also add an image or table with the keyboard. To add a table, press Alt and then on N to the tab Insert to activate. Then the keys B and a typing, you enter the field with which you insert a table (remember, you don’t have to remember Alt press indicates Word which keys belong to which option). To add an image, press again Alt and then on again N (although the tab is already active, you must first activate it again to be able to choose a sub-option) and then on a and F to insert an image. You can now select the image (with the arrow keys) to add it with Enter.
7 Save file
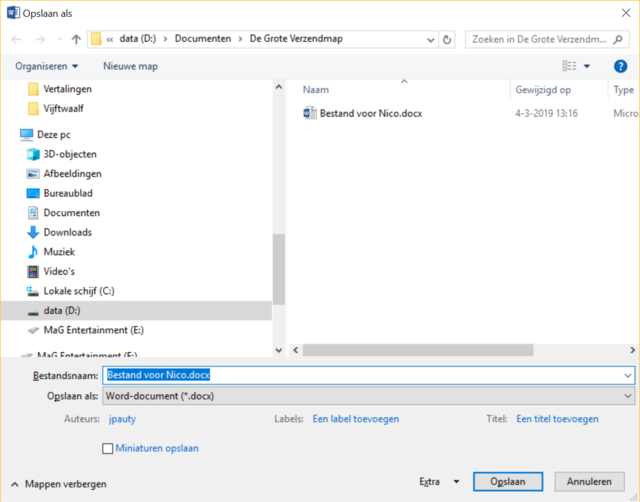
The fastest way to save a document is by using the key combination Ctrl + S (the s of save). But if you want to save it in a different folder, you have to do it differently. We want the document in the folder in which we will also place images later. Press F12 to open the Save-as window. By repeatedly pressing the Tab button, select different parts of this window, which you can then operate with the arrow buttons. This way you can select the right folder (we admit, this works slower than with the mouse). If you want to create a new folder, use the key combination in this window Ctrl + Shift + N. You can also go to the button New map navigation, but the key combination is of course much faster.
8 Copying images
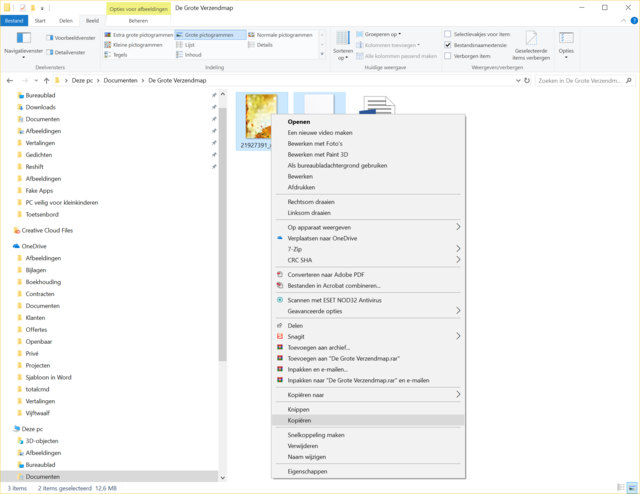
We have now created a Word document and saved it in a folder on our computer. The person to whom we email the document has also asked us to send two images that he needs. Those images are elsewhere on our computer, so we will first copy them to the folder that also contains the Word document. Press Windows key + E to open Windows Explorer (the letter e stands for Windows Explorer in English). You can also use this repeatedly Tab to navigate to the correct part of the window. You can also press the Alt key just like in Word to conjure up key combinations. Copying (or cutting) a file is exactly the same as copying text in Word: Ctrl + C to copy, Ctrl + X to cut and Ctrl + V to paste the file into the folder where you want it.
9 Rotate images
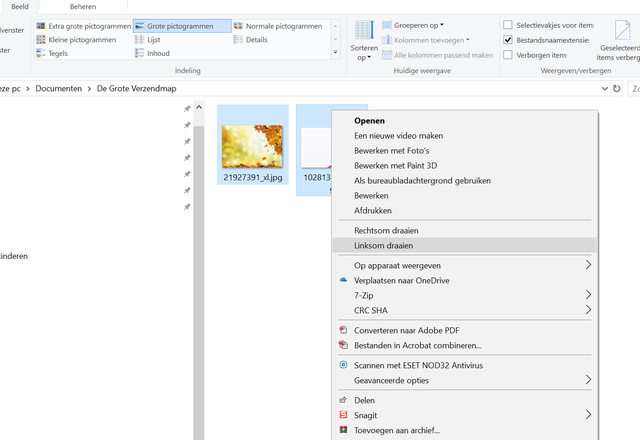
We have pasted the two files requested in the correct folder, but we see that they are not upright: both files must be rotated a quarter turn. Even now we don’t need the mouse. First select both: navigate in Explorer to the first file, hold the Shift button and navigate to the second file to select both files. Are they not directly next to or below each other in the folder? First navigate to the first file, hold the Ctrl key while moving to the second file with the arrows, and then press (with Ctrl still pressed) Space bar.
The two files are selected. Now call up the right-click menu. This is possible with the key combination Shift + F10, and some keyboards have a separate key for it (see step 1). Now navigate with the mouse to the option Turn to the left or Turn clockwise and press Enter to apply this. You have now rotated the images.
10 Create zip file
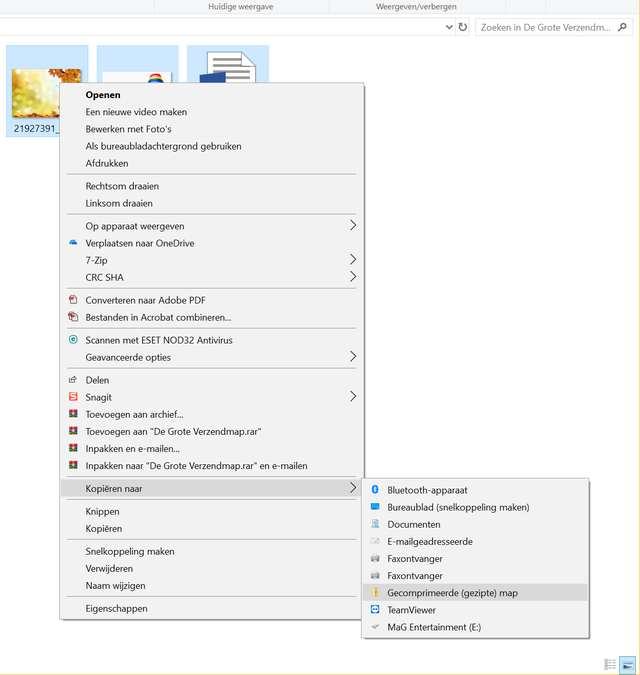
We will now create a zip file. Windows has built in a function for that itself, but it is also possible with a program like WinZip or WinRar if you have that installed. In this case we want to include all files in the folder where we are in Windows Explorer in the zip file. So press Ctrl + A. Now press again Shift + F10 to open the context menu and select the option that comes with your compression program (for example, in the case of WinRar Add to archive). If you do not use extra software, you will find it in the right-click menu under the heading Copy to. The files are now packaged in a zip file (or rar file) and are ready to send.
Tip 11 Rename file
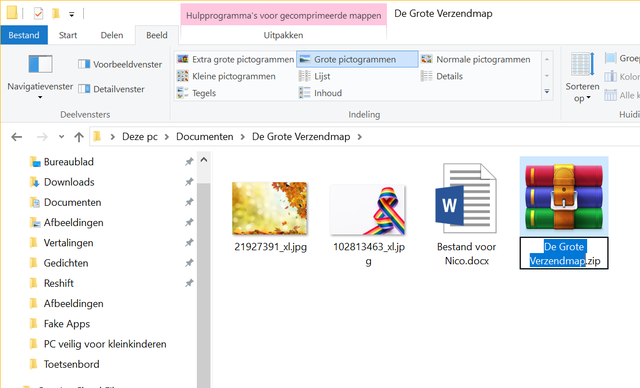
The zip file usually has the name of the folder. And since we have called that folder The Large Send Folder, that is not really a suitable name for a file that we want to send to someone. We are going to rename the zip file. In Explorer, navigate to the file that you want to rename, select it and press F2. The text of the file is highlighted in blue and you can change the name. Make sure you leave the file extension intact, because if you accidentally delete the bit of .zip, Windows (and therefore your recipient) will no longer know what type of file this is and it can no longer be extracted.
Tip 12 Email file
You can of course email the file in different ways. If you want to use a service like Gmail, you will first have to start the browser (similar to Word) and navigate from the Gmail site (where the Tab keys will help you).
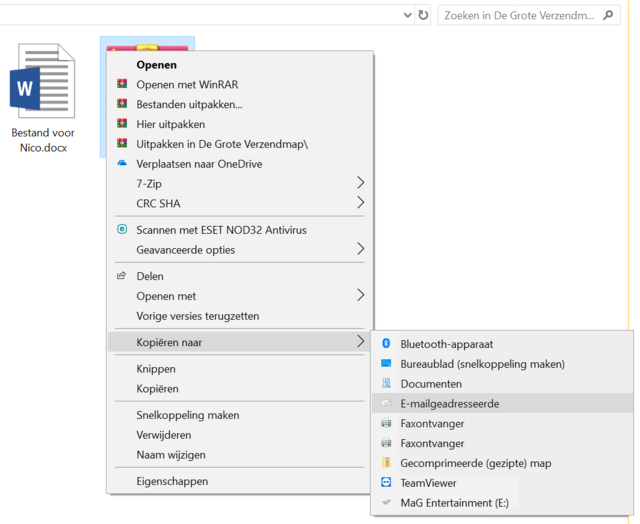
We now assume that you have installed a mail program on your PC. Select the zip file in Explorer and activate the right click menu (again with Shift + F10). You can now find it under the option To copy to the option Email recipient. Select this option and press Enter, then your default mail program will be opened automatically, a new message will be started and your attachment will be added to this message.
Tip 13 Shut down the computer
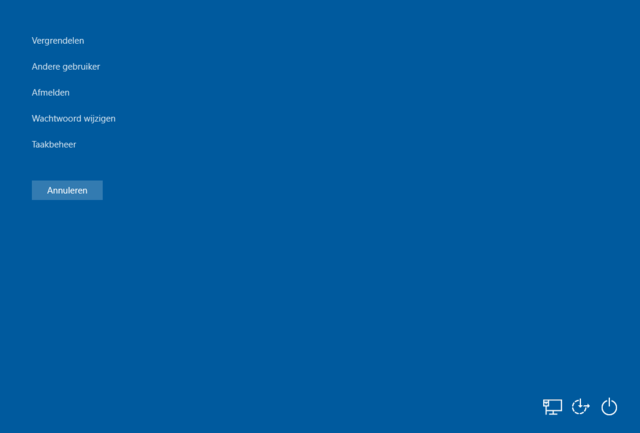
Good, the mail has been sent with our document in it. It is time to close. And of course we do that – entirely in the style of this article – not with the mouse, but with the keyboard. To shut down your computer quickly, do not press the Windows key (contrary to what you might think), but use the world-famous key combination Ctrl + Alt + Del. A menu will now open in Windows, with the button at the bottom right to close your PC. Use the Tab button to navigate to this section, select the correct button with the arrow buttons and press Enter to actually shut down your PC. You have now done everything with your keyboard from start to finish. You notice, a mouse can be faster, but if you practice all these options, you’ll be just as fast with your keyboard as with the mouse.
Fn key
Some keyboards (especially those of laptops) have a special key in addition to the Ctrl, Shift, Alt and the Windows key: Fn. Additional functions of the laptop are called with the Fn key. The possibilities of the Fn-test differ per brand / type of laptop, but are easy to find, which are in a color or in small on the relevant keys. The function is usually indicated with an icon. For example, with the right Fn key combination you can quickly dim the screen or make it clear, adjust the sound volume or pause a movie.