Fortunately, it almost never happens, but something can also go seriously wrong on a Mac. For example because a piece of software seriously misbehaves, or because your hard disk / ssd is dead. You don’t have to give up: restore your Mac and your software without much thought.
In rare cases, it may be better to accept the facts: your Mac has developed such a major software problem that it is actually better to perform a ‘clean’ installation of macOS. Fortunately, this is very rare. At the same time, this operation is surprisingly doable, thanks to Time Machine. You can often restore the entire system by shutting down your Mac. Then switch it back on – after a while – and hold down the Command-R key combination until the Apple logo appears. Then you can let them go.
In the recovery screen that then appears after a while you can choose to restore a previously made Time Machine copy. However, that does not always work well, especially if something crazy has happened in system files. Disaster scenario? No! You can still restore everything, but first do a clean installation and then get started via the migration assistant.
The end result is the same (or actually often even better): a clean installation of the very latest version of macOS, and all your programs, documents and settings back. Ultimately, there is little difference in time when trying to restore a Time Machine system image, or a fresh installation of macOS followed by the migration assistant. To start, turn off your Mac.
Choose from most recently installed or most recent version
Read now first before doing. Turn on your Mac. To reinstall the exact same version of macOS that was already on your system, hold down Command-R during startup until the apple appears. To install the latest macOS available for your Mac, hold down Command-Option-R. In this example we will go for the latter option. Catalina is originally still running on the Mac that has become unstable due to an obstructive virus scanner (and no sense / time to find out the cause or wait for a slow solution from the manufacturer). Now that Big Sur is ready and doesn’t seem to have any major bugs after being released in the wild for a few weeks, we want to install that version right away. After all, this will save you an upgrade!
Basically, in this example we are using Command-Option-R. You will see a globe with a progress indicator below it, after which a recovery environment is downloaded fresh from the internet, so wait. By the way, if your computer is only connected via WiFi, you may be asked to choose a network and enter its password. So keep that at hand.

Erase disc
Once you reach the recovery menu, it is important to erase the hard disk / ssd of your Mac. For that you start Disk Utility in the menu. In the window that opens, select in the column on the left Macintosh HD and then click Delete in the toolbar. In the dialog that opens, click Delete volume group, if prompted, enter your Apple ID password and wait for the job to be done. Close the Disk Utility window and click on the recovery environment main menu Reinstall macOS. Then – via a wizard – the most recent version of macOS available for your Mac is installed.
In some cases, that could still be Catalina at the time of writing, after which you have to manually upgrade to Big Sur afterwards at a time that suits you. In our case, Big Sur was ready right away. Since it is a clean installation, this whole procedure is quite fast (somewhat depending on your internet connection, as the entire installation package must be downloaded).

Time Machine and Migration Assistant
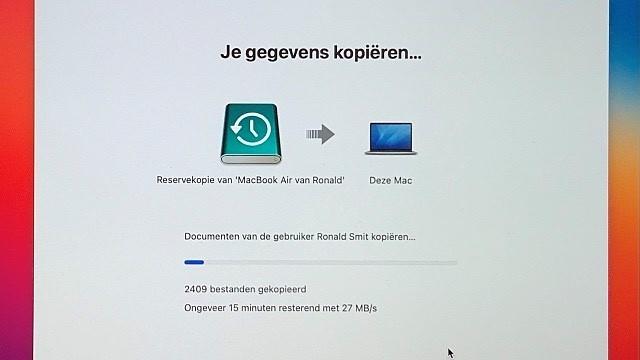
After waiting a while, the real magic begins at the end of the installation. After the freshly installed macOS has booted for the first time, a wizard will begin. Here you choose things like country, WiFi network and so on. An important step is the one in which the migration assistant asks you if you want to copy data from a ‘different’ computer. Here, select the option to transfer data from a Mac. click on Go ahead and plug in your Time Machine drive (if not already done). Once found, select this drive and click Continue. click on > for the block with the Time Machine copy; you will now see an overview of all available copies. You now choose the most recent date that you know your Mac was still working properly. Keep in mind that this may cause you to lose backed-up documents at a later date. But because Time Machine runs a copy every hour, you have – we think – more than enough to choose from. With the date selected, click Continue.

Select all options
Then choose all the items offered (Apps, your username (and including documents), Other files and folders and System and network. Wait until all files have been collected and click Continue again. Click Set password and – well – set a password, followed by a click on Continue. Then the restore process begins; time to drink coffee. If you had a lot of data on your Mac, this can take a long time. But you don’t have to think about it, so no stress. When the process is complete, the Migration Complete window appears, click the button Reboot now (or wait for this to happen on its own). Then you go through some more questions of the installation wizard, after which you end up on the desktop. Indeed: with all your apps, settings, documents and more just as they were. But now installed on a fresh (and in this example brand new version of) macOS.

Always use Time Machine!
The only requirement for all this to actually work so smoothly is a Time Machine that can do its job. So preferably always leave the Time Machine backup disk connected or do that on a laptop at least once a week (preferably at least once a day, for example at the end of your working day). That way you never have to worry about data loss. Even if your hard disk or ssd breaks down. Then go through this procedure if a new disk / ssd is installed and you will soon have a working and completely installed system in front of you. Finally, a final tip: make sure you have as little software installed as possible on a work Mac, but only install the things you actually use. Always keep your data on a NAS or, if necessary, an external hard disk. If something goes wrong, the whole procedure explained here will run smoothly and you will be back to work within an hour and a half. Quite a comforting thought, right?
Finally, a golden tip: keep a classic wired mouse at hand. The wireless Mac mouse sometimes does not work in the recovery environment. Not even the keyboard, but that can easily be solved by simply connecting it with a USB lightning cable. This is not possible with the mouse, but any standard USB mouse (including those for the PC) will work fine!
.