Have you taken a nice photo, but do you want to perfect it? Then try editing it with the photo editing program Photoflare.
About Photoflare
Making a photo more beautiful is a breeze on the PC. At least: with the right photo editing program. There are all kinds of programs available, from free to paid and from simple to complicated. Photoflare is free, to use in Dutch and easy to install. Moreover, it is very user-friendly: the most frequently used functions are not tucked away in a menu, but are located on handy buttons. This article covers how to download and install Photoflare. In addition, we highlight some applications to make photos more beautiful.
Download Photoflare
Download Photoflare from the makers’ website. You download a ZIP file. It is useful to create a shortcut on the Desktop to Photoflare. This may sound complicated, but we take you step by step through the process.
Start downloading. Do this as follows:
- click on this link. A window with an advertisement may appear. Click on the cross to close the ad.
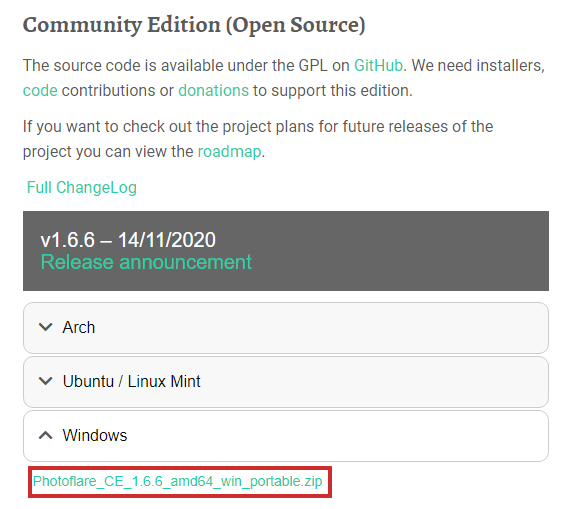
- Click on the Photoflare site Windows.
- Click on the name of the file below it. A window with an advertisement may also appear. Click on the cross to close this. The download will start automatically.
With each new version that appears, the name of the ZIP file changes. Currently it is ‘Photoflare_CE_1.6.6_amd64_win_portable.zip’.

The file is downloaded. In Chrome you will see the download file in a narrow bar at the bottom of the screen. The file will also be placed in the Downloads folder in the Explorer.
- Double click on the file in the narrow yellow bar at the bottom of the screen. Don’t see this? Then start the Explorer, click on Downloads and click on the map Photoflare_CE_1.6.6_amd64_win_portable.zip.
The Explorer opens.
unpacking photoflare
- Press the button Unpack everything in the menu bar.
- Don’t see this? Then click on the map Photoflare_CE_1.6.6_amd64_win_portable.zip. Click on the pink button in the menu bar unpacking. Now the button ‘Extract all’ does appear.
- A menu appears. Check the box for (if necessary) Show extracted files when the extraction is complete.
- click on unpacking.
- A new Explorer window opens.
- Double click on the folder Photoflare_CE_1.6.6_amd64_win_portable.
- Double click on ce_photoflare.exe to start Photoflare.
Create shortcut on the Desktop
It is more convenient to have a shortcut on the Desktop:
- Right click on the file ce_photoflare.exe
- click on Copy to > Desktop (create shortcut).
- There is now a shortcut to Photoflare on the Desktop. The button is named ‘ce_photoflare.exe – Shortcut’. Double-click the shortcut to launch Photoflare.
Watch out: wrong warning
Are you using Windows Defender on the computer? This program gives a warning when Photoflare is opened for the first time. This warning (“Your PC is protected”) is incorrect, Photoflare is a safe program. Do the following:
- Click on the screen More information.
- click on Execute anyway.
Photoflare will now start up.
Getting Started with Photoflare
Photoflare starts in most cases directly in Dutch. Well, Dutch… The translation didn’t go perfectly everywhere. Start the program in English and if you prefer not to, close Photoflare once and start it up again.
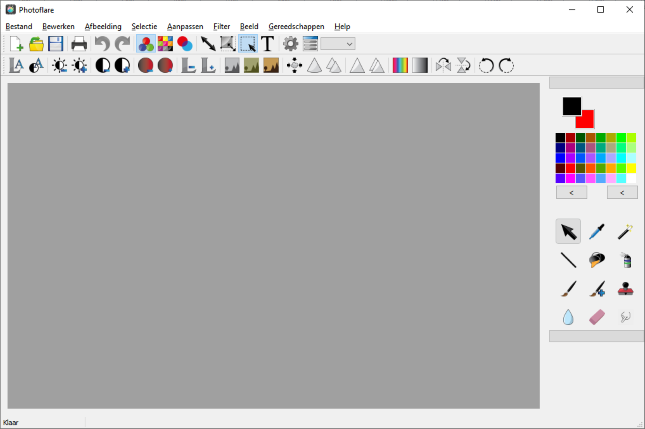
You will now see the following:
- At the top of the screen is a menu bar with several buttons, such as To process, Selection, To adjust and Filter.
- Below the menu bar is a series of buttons, spread over two lines. Hover over several buttons for a moment to see what they’re for.
- Below that is a large gray area. This is where the photo you want to edit will appear.
- On the right is a bar with different colors and tools, such as a brush, a stamp and an eraser.

Open and save photo
Everything starts with opening a photo:
- click on File > Open.
- The Explorer opens. Browse to the folder containing the photo. Click on the desired photo and then To open.
- The photo is now in Photoflare. It is convenient to immediately save it with a different name. This prevents the original from being lost when you make edits.
- click on File > Save As.
- The Explorer opens. Browse to the folder where you want the edited photo to go. Give it a meaningful name. click on Save. Now nothing stands in the way of editing.
action on
Editing a photo is always a lot of trying. Were you a little too enthusiastic about adjusting the colors or do you not like a crop? No worries. Simply undo any action with the key combination Ctrl+Z on the keyboard. Press it once to undo only the last action and more to undo multiple actions. This can also be done via the menu:
- Click in the menu on To process.
- click on Undo.
Crop photo
Emphasizing a special part of a photo or cutting off unwanted parts: this is done via cropping. Use the mouse to draw a box around the part to be kept, and the rest of the photo can be removed:
- Click on the ‘Show selection’ button:

- With the left mouse button pressed, draw a box around the part to be preserved. A dotted line appears.
- Right-click and click on the shortcut menu crop.
The photo is cropped.
Automatically adjust colors
Is the photo a bit faded, too dark or too light? Then try the automatic color levels feature.
- Press the button Car levels
 . The photo changes immediately.
The Auto Color Levels button may have an overly strong or odd effect. Fortunately, that is easy to undo with Ctrl+Z.
Adjust brightness and contrast
Adjust the brightness or contrast with a few buttons:
- click on Brightness (-)
 to decrease the brightness.
 - click on Brightness (+)
 to increase the brightness.
 - click on Contrast (-)
 to decrease the contrast.
 - click on Contrast (+)
 to increase the contrast.
Make a photo black and white, old-fashioned or sepia
Tired of the standard colors of the photo? Try one of three standard effects: 
- The button on the left makes the photo black and white.
- The middle button gives the photo a vintage look using a greenish filter.
- The button on the right makes the photo sepia.
You can switch between the effects by clicking one of the other two buttons.
Sharpen a photo
Is a photo out of focus? Click on the headline sharpen and it is adapted.
Apply filter
Applying a filter to a photo can have a creative effect. Photoflare has several options for this. They are in the ‘Filter’ menu. Try them in turn to see what effect they have. click on Filter > Artistic > Oil paint for a painterly effect or on Filter > List > Simple List/3D List for a frame around the photo.
Getting to know Photoflare better
You hear: there is a lot you can do with Photoflare. More than we can name in this article. The best way to get to know the program better is to experiment with it. Click on the various buttons and menus and see what the result is for the image. Undo the action if you don’t like it. Draw on a photo with the tools from the right bar and use, for example, the spray can for ‘graffiti’ and a brush for a fine drawing.