
The open source multimedia player that has become a real reference in the field is packed with features that are often unknown to users.
There was a time when when trying to play a video on your computer, you had to first download and install the correct codec packs. And if that seems incredible today, it is undoubtedly the students of the Ecole Centrale Paris who set up the VideoLAN project to whom we must thank.
VLC, which came out of this project, became open source in the process. The multimedia player created by Jean-Baptiste Kempf has in a few years established itself as a benchmark in the field.
Used by more than 400 million people around the world, VLC is known to everyone and owes its success to its ability to play any audio or video file format almost without having to download a third-party codec. Let’s not be afraid of words, VLC is undoubtedly the best existing multimedia player to date.
If the majority of its users only use it to play videos on their computer, VLC is capable of much more. You will discover in the following lines, part of what it is capable of doing.
Download VLC 32 bit for Windows (Free)
Download VLC 64 bit for Windows (Free)
Download VLC for macOS (Free)
Download VLC for Linux (Free)
1. Watch videos online
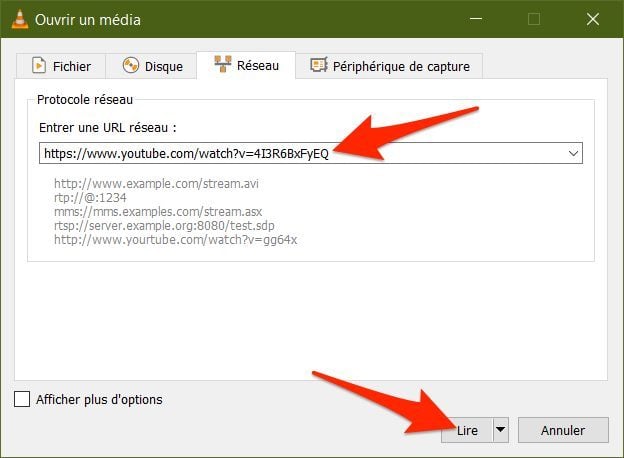
VLC is not just for playing videos stored on your computer. The media player can also play streaming videos. How ? Simply by submitting the URL of the video stream you want to watch. To do this, you just have to click on the Media menu and then choose to Open a network stream.
In the Open a stream window that appears, all you have to do is paste the URL of the video in the field provided for this purpose and confirm by clicking on Play/Open to start playing the video.
2. Download YouTube videos
Although not its primary function, VLC can be used to download videos. Convenient if you want, for example, to be able to watch the latest episodes of your favorite YouTube channel as you prepare to confine yourself to Creuse.
For this you will only have to open a streaming video in VLC, as seen in the previous step. Click on the Tools menu (or Window on macOS) and then choose to display Media Information. Copy the URL displayed in the Location field.
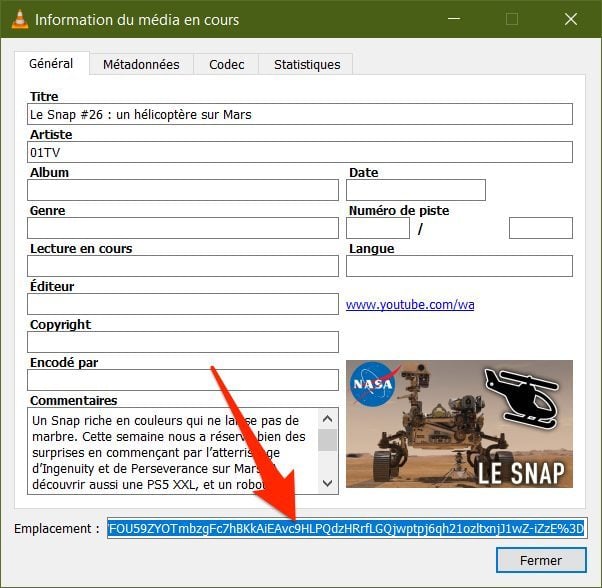
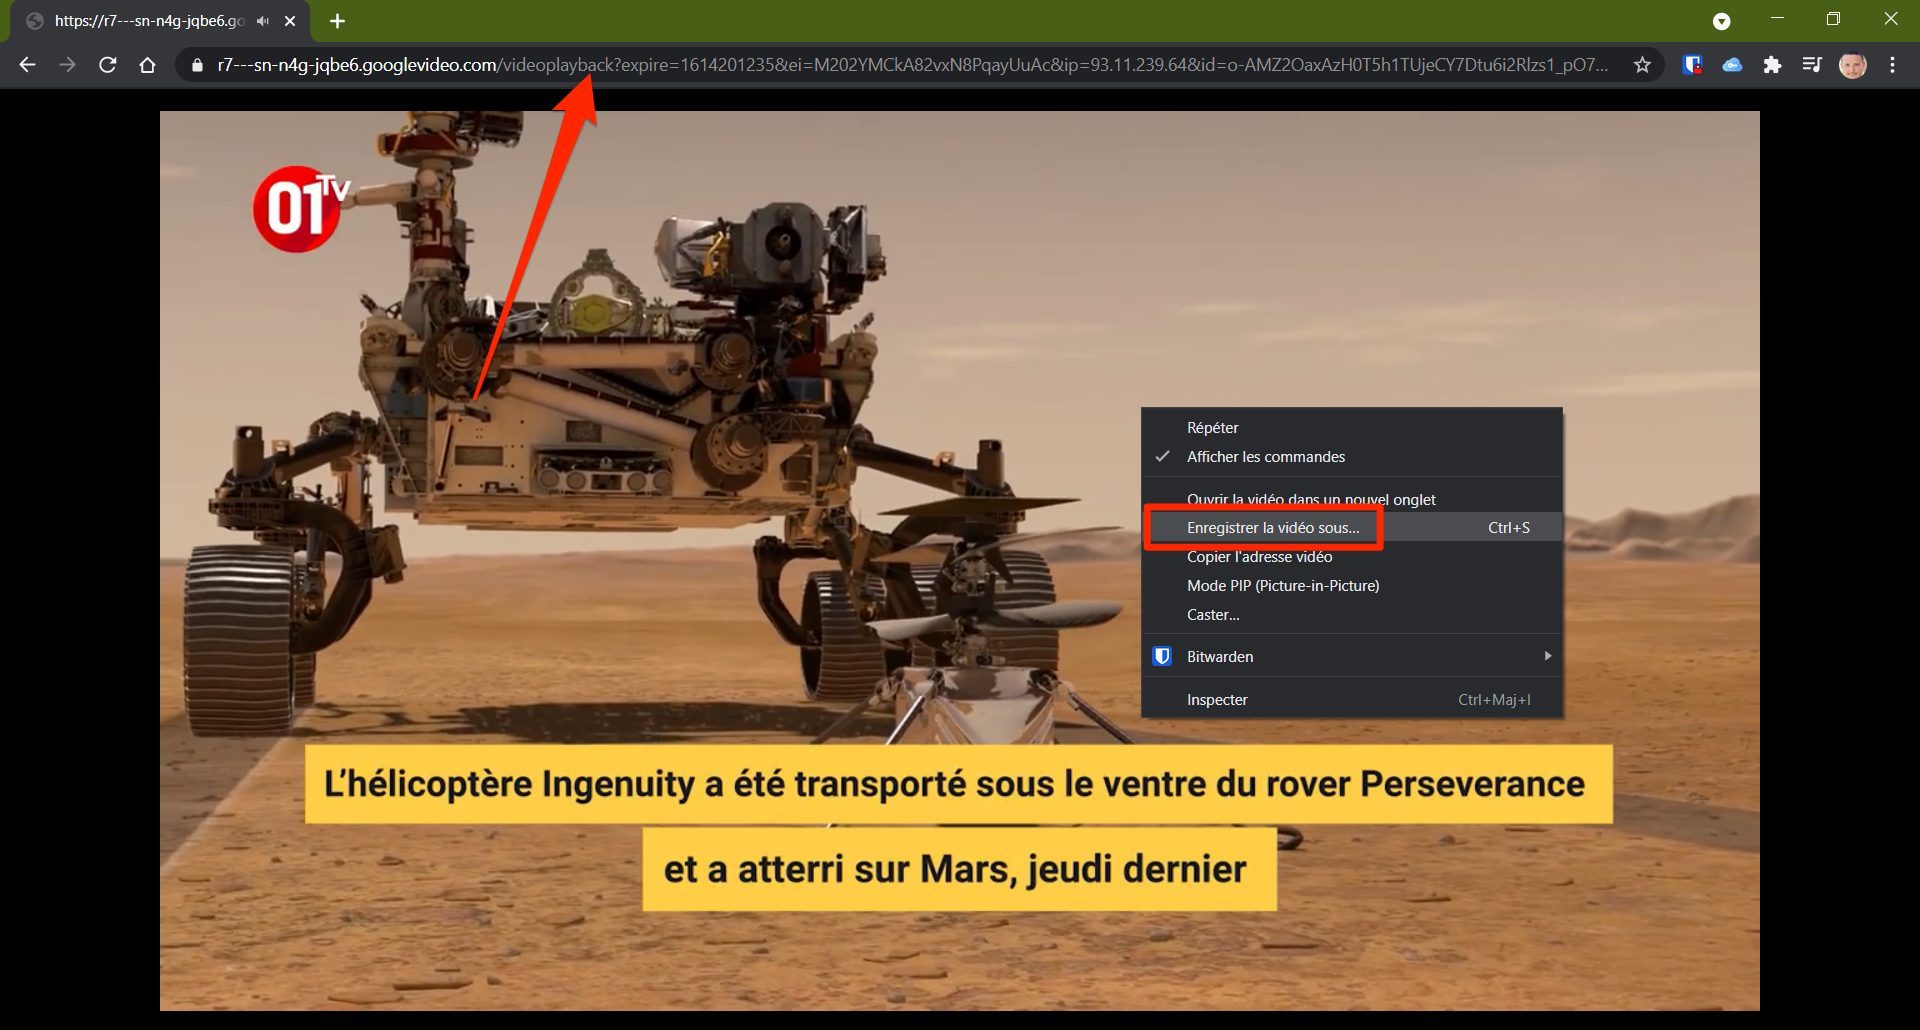
Paste it into your web browser’s address bar. Using right click on the video, you will be able to save the video to your computer for offline playback.
Also see video:
3. Generate still image from video
Extract a photo from a video? It’s entirely possible. To do this, navigate to the moment in the video that you want to capture in a screenshot.
To navigate with more precision, image by image for example, use the E key on your keyboard. Once on the right image, click on the Video menu to take a Screenshot.
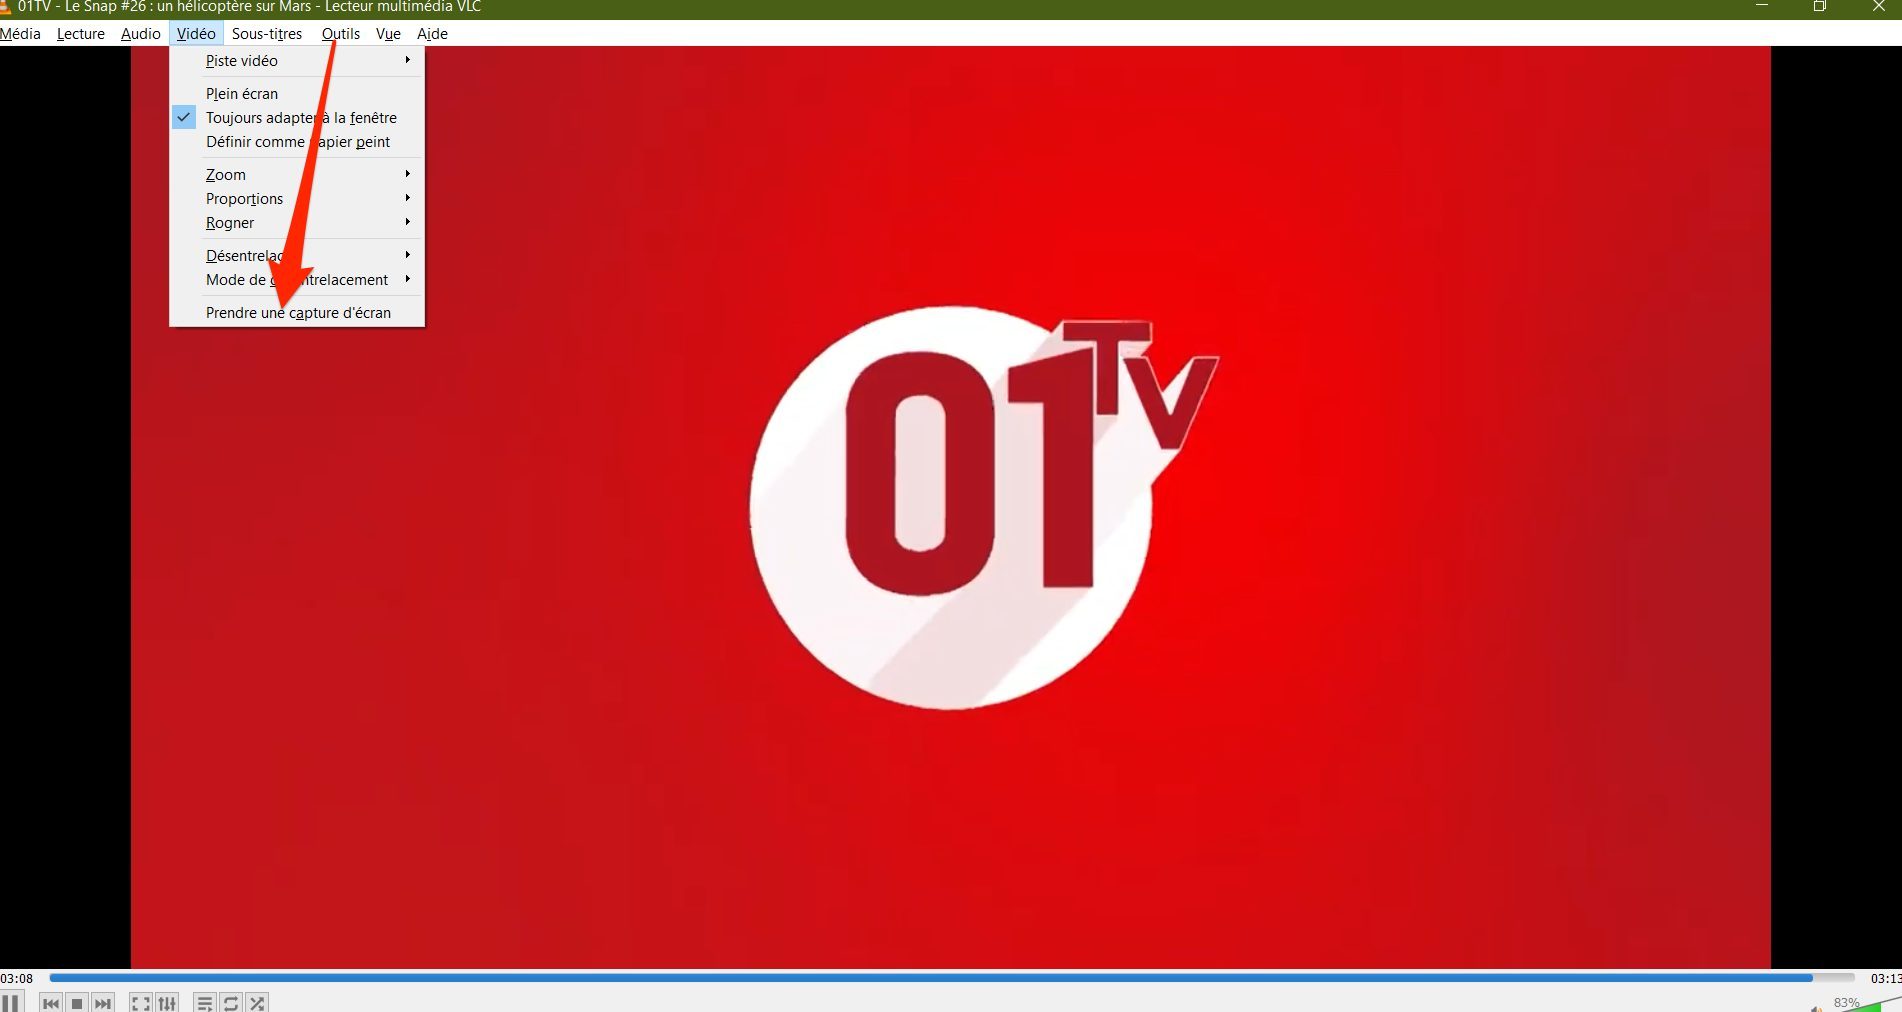
Screenshots taken in VLC are saved by default in the Images directory on Windows as on macOS, with a name starting with vlcsnap.
4. Convert videos
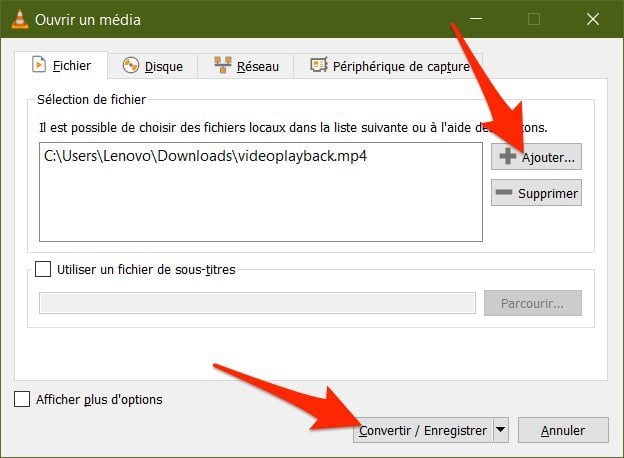
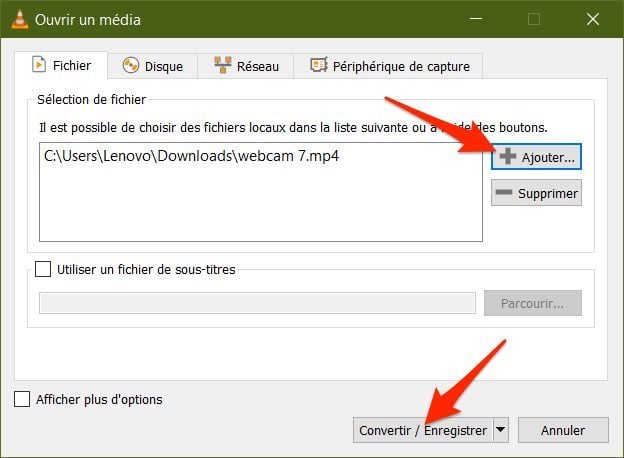
You don’t necessarily need dedicated software to convert a video. VLC knows how to do it. To convert a video to another format, click on the File menu and then on Convert / Stream.
Drag and drop the video to convert in the window that opens or click Add to select it from the file explorer. Then click Convert/Save.
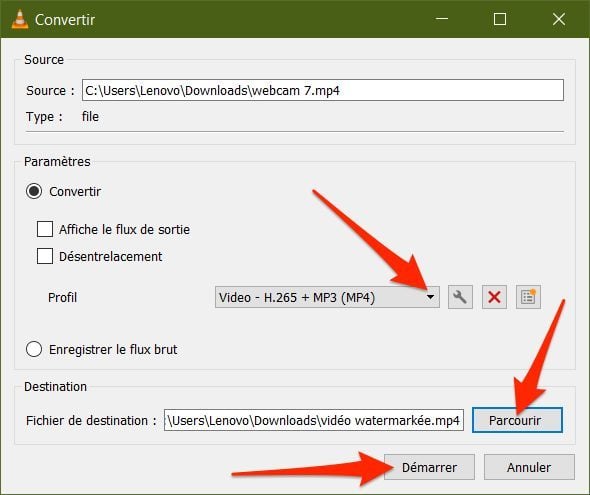
In the Convert window that appears, in the Profile line, expand the drop-down menu to select the output conversion format. You can, for example, choose to convert a video file to MP3 format to keep only its audio track.
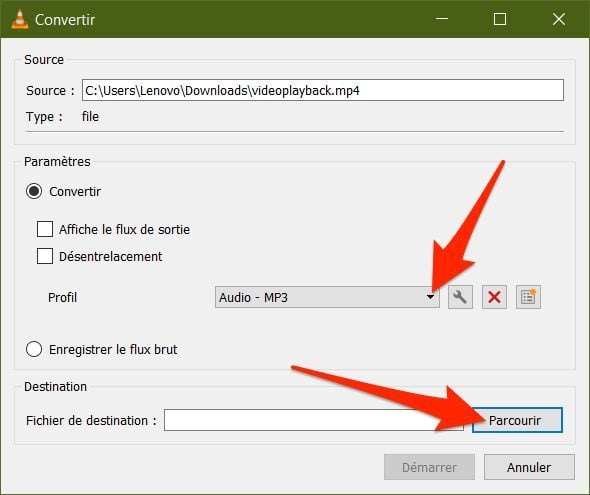
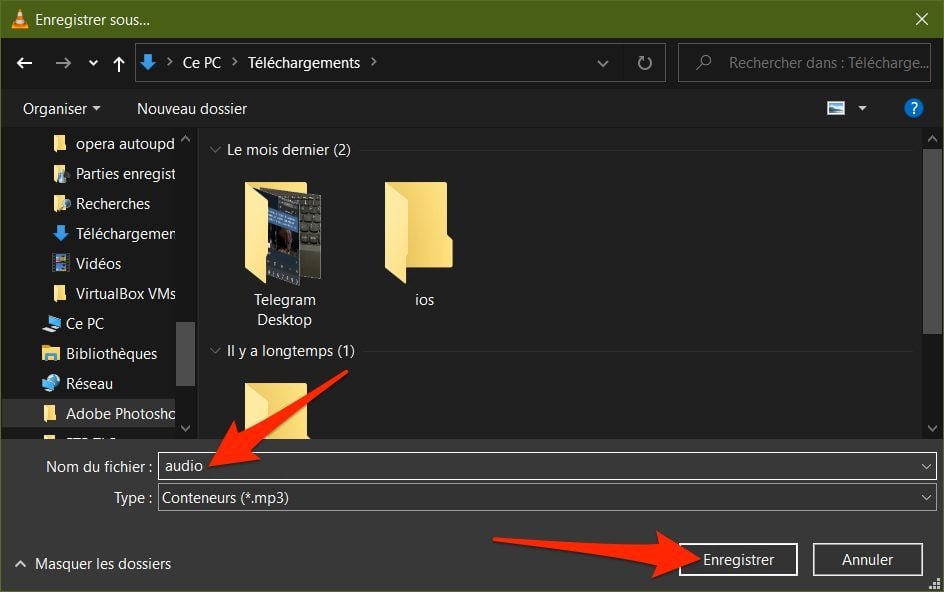
Once the profile has been chosen, click on the Browse button in the destination section, choose a save directory, give a name to your file and validate by clicking on Save.
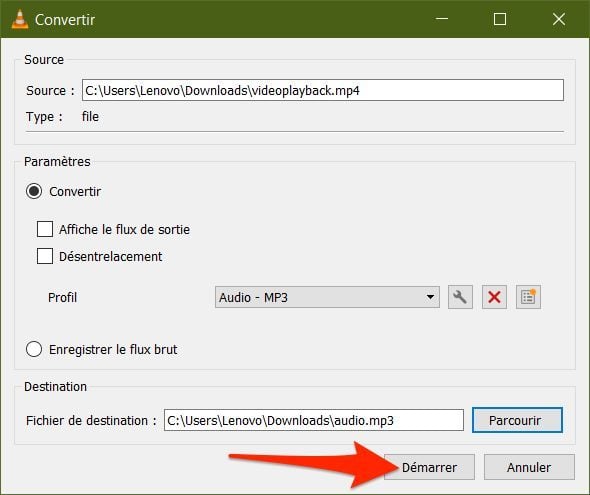
Then launch the file conversion by clicking on Start.
5. Record part of a video
You don’t need video editing software to perform simple manipulations on your video files. For example, it is possible to extract a specific passage from a video directly in VLC.
To do this, you will first need to enable the display of advanced controls. To do this, click on the View menu, then click on Advanced Controls. A new line of control buttons should be integrated above the native control keys.
Then open the video from which you want to extract a passage and navigate to the beginning of the passage to keep (using the E key on the keyboard to advance frame by frame if necessary).
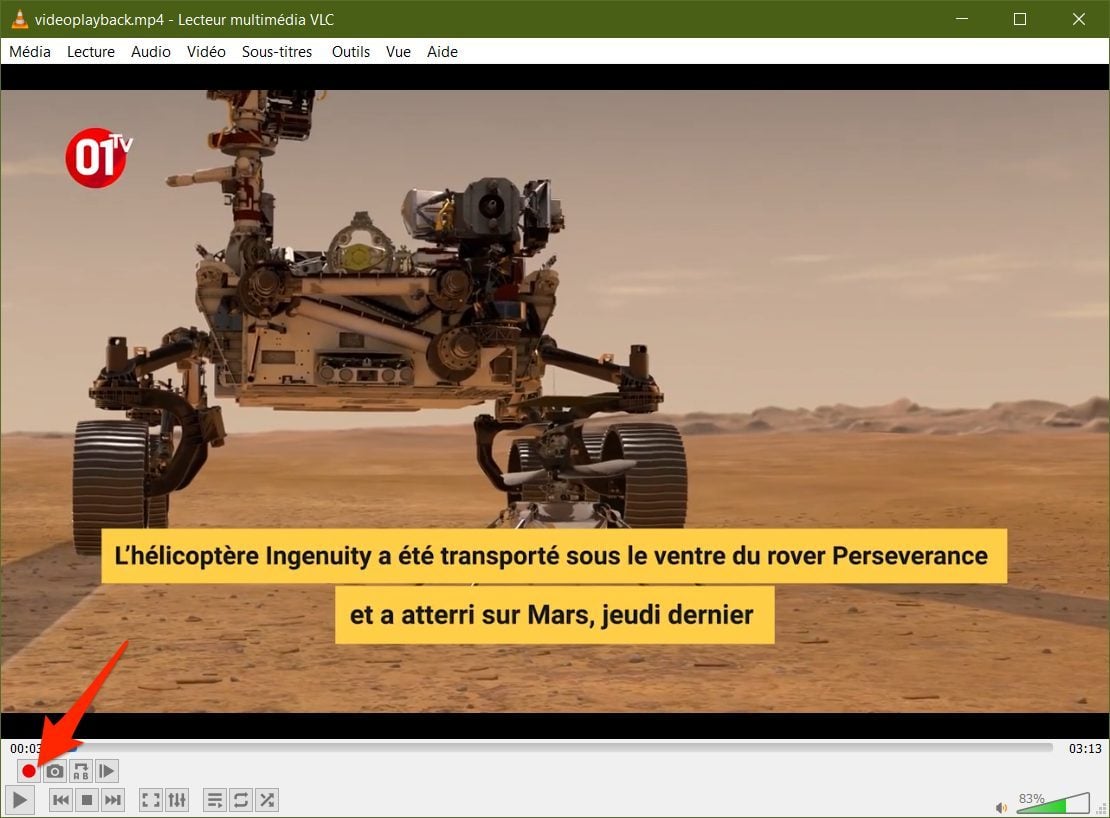
Press the red record button and then the play button to start playing the video. Press the record button again to stop capturing the passage.
The video passage you have just recorded is saved directly in the Videos directory on Windows with a name starting with vlc-record-xxxxx.
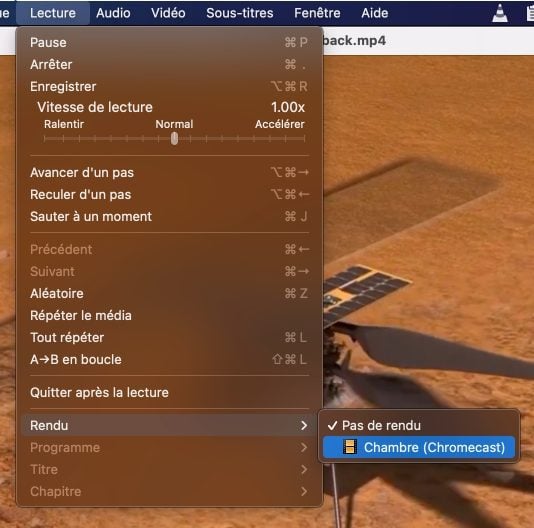
6. Cast a video to ChromeCast
Would you like to be able to watch the video of your youngest child’s first steps on the big screen in the living room? You can absolutely launch the video in VLC and send the playback to the Chromecast connected to your TV.
To do this, open the video in VLC, click on the Play menu, then go to Render. You should be able to select the Chromecast in the room to cast your video to.
7. Record your computer screen
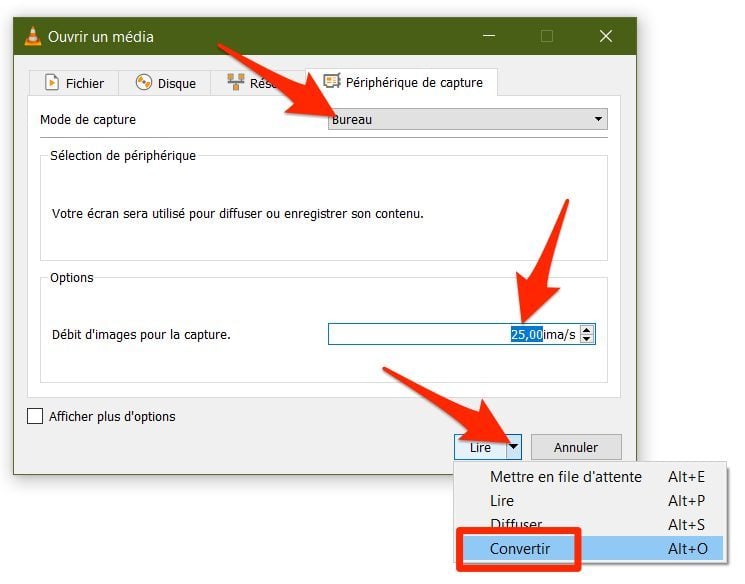
Yes, it is possible to use VLC to record a screencast on your PC. To do this, click on the Media menu and then choose Open Capture Device.
In the window that appears, click the Capture Mode drop-down menu and select Desktop. In the options, customize the Frame rate for capture by setting it to at least 25 fps for a sufficiently smooth result.
Then click the arrow on the Play button to display other options and choose to Convert.
In the next window, select a Profile (Video – H265 + MP3, for example to save a video screenshot with sound) and click Browse.
Select your save directory and fill in the name under which your video screenshot will be saved. Validate by clicking on the Save button in the file explorer window.

Finally, click the Start button to start recording the video capture. When your screencast is done, just press the Stop button in VLC to automatically stop and save your video.
8. Record your Webcam
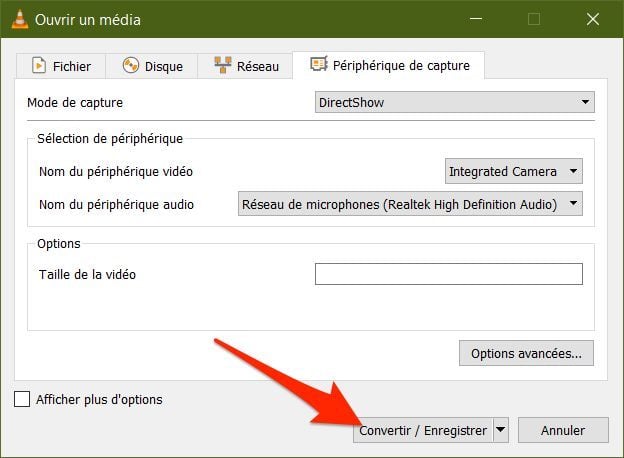
If VLC allows you to record your screen, it is also able to record a video stream from your Webcam. To save your selfie video with VLC, click on the Media menu and then choose Convert / Save.
In the Open Media window that opens, go to the Capture Device tab, then in Capture Mode, select DirectShow from the drop-down menu.
In the Device selection section, click on the drop-down menu in front of Video device name, and choose your PC’s webcam. Do the same for the Name of the audio device, in order to select the microphone integrated into your PC or your Webcam.
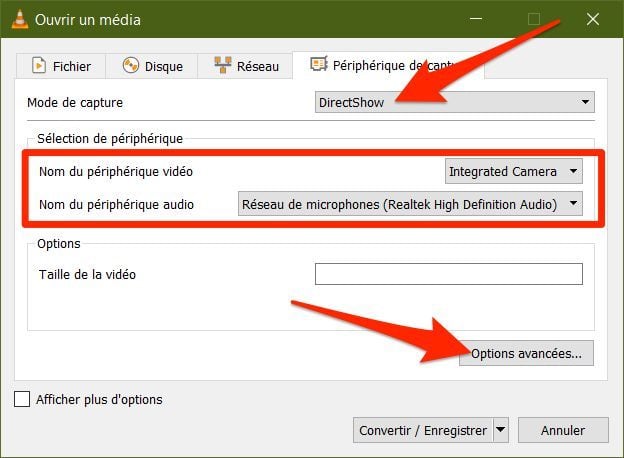
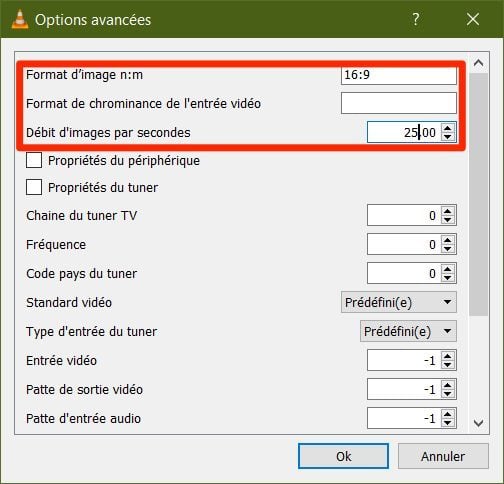
Then click on Advanced Options. You can define the aspect ratio, 4:3 by default, to change it to 16:9 for example. Take the opportunity to customize the Frame rate per second by entering at least 25 to 30 frames/s so that your video is fluid, and click OK to confirm your preferences.
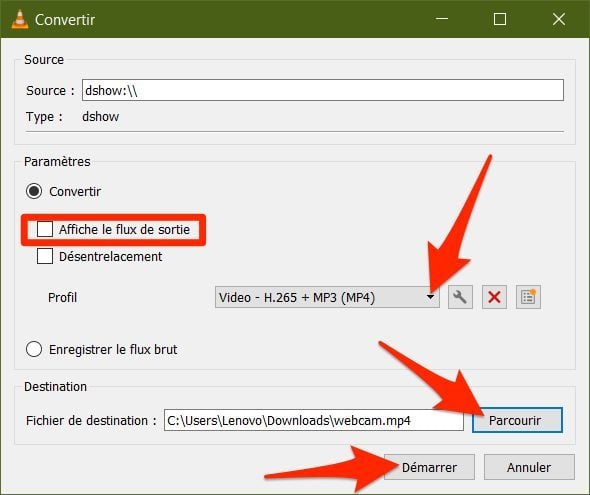
Then click on the Convert/Save button.
In the Convert window that appears, select your profile (Video – H265 + MP3), click Browse, and navigate to the directory where you want to save your video. Choose a name for your file and validate by clicking on Save.
Check the Show output stream box to display a video feedback of the recording, then click Start to start recording your webcam’s video stream. To stop recording, just click the Stop button in the media player.
9. Protect your videos by adding a watermark
Before sharing a video online, it is often preferable to add a watermark to prevent a third party from stealing it and taking all the credit. To do this, you can use VLC which has a dedicated option.
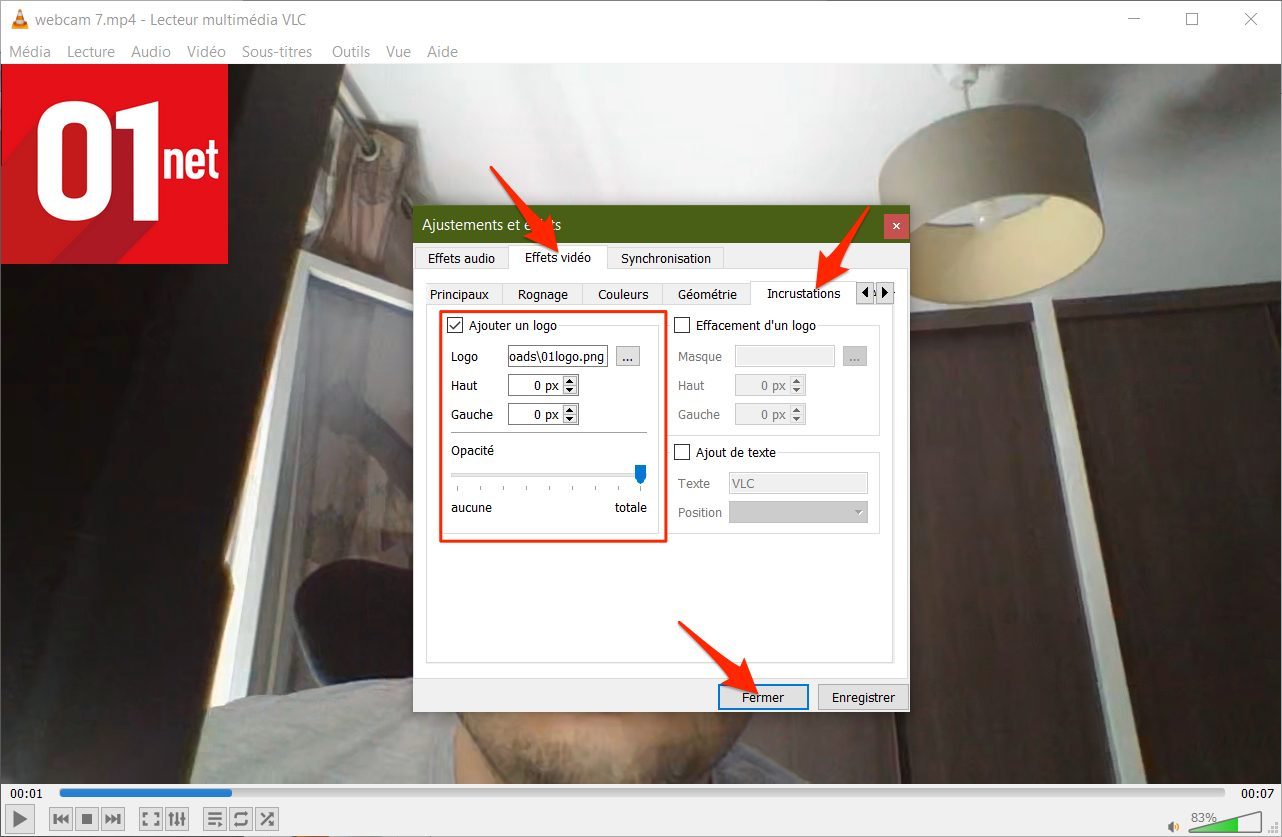
To watermark one of your videos, open it in VLC and pause it. Then click on the Tools menu and then on Effects and Filters.
In the Adjustments and Effects window that appears, go to the Video Effects tab, then click on the Overlays sub-tab. Check the box Add a logo, then click on the button with three small dots to open the file explorer and select the logo you want to embed as a watermark in the video. Then fill in the number of pixels offset from the top and left of the video, in order to reposition the logo if necessary. Then click Save and then Close to confirm your changes.
As it is, your video plays with a watermark, but it’s only a preview. You must therefore export the video in this state to have a final video file on which the watermark appears.
So click on the Media menu and then choose the Convert/Save option. Click the Add button to select your video file, then click the Convert/Save button.
In the next window, select the profile (export format of your video), then click Browse. In the file explorer window that opens, select the save directory and fill in the name of your new watermarked video.
Click on Save to validate and close the file explorer window. Finally, click the Start button from the VLC Convert window to start exporting the watermarked video.
10. Play videos from an archive
In addition to being able to play almost any multimedia file, VLC is also able to play videos contained in a compressed folder, without the need to extract the files.
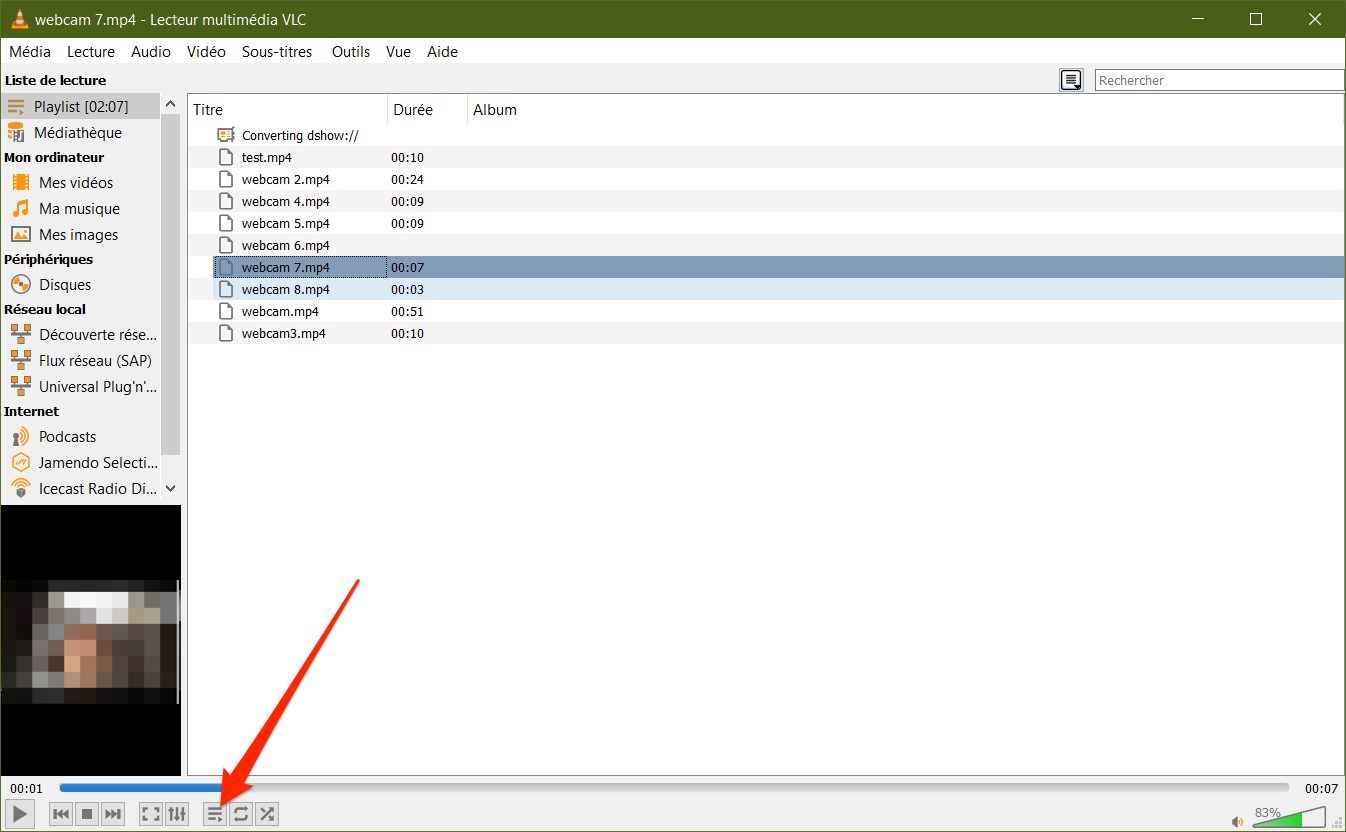
You will then only have to drag and drop the compressed folder containing your videos for VLC to start playing them. You will be able to jump from one video to another by clicking on the button to display the player’s playlist.