 Create a digital address book using Excel. Then the list of contacts is easy to adjust or expand.
What is Excel?
Excel is actually a calculation program. But the structure with rows and columns also makes the program suitable for address lists, among other things. Sorting contacts in alphabetical order, for example, is very convenient. We show you how this works in Excel versions from 2007.
Parts Address List
With a digital address list you are completely free to choose your own format. In any case, remember the following information: first name, last name, address, zip code and place of residence. But also telephone number, e-mail address and date of birth. Optionally, add a ‘Relationship type’ column and indicate your relationship with the person. For example, family member, friend or colleague.
Create address list
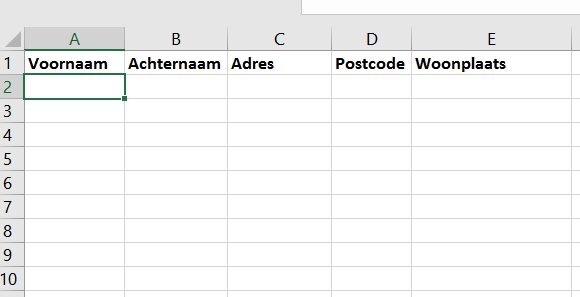
Start Excel, open a blank workbook and create a mailing list:
- Click in cell A1 and type the title/heading of the first column, for example “First Name”.
- Click in cell B1 and type the title of the next column, for example, “Last Name.”
- Click in cell C1 and type the title of the next column, for example “Address.”
- Continue in this way until all desired categories have been created.
- Give the columns the correct width, so that, for example, the entire address fits in them. The width can be (further) adjusted at any time.
- Select a column by clicking on the letter above it.
- Place the mouse pointer on the right side edge.
- Hold down the left mouse button and move the mouse to adjust the width.
- Release the mouse button when the size is to your liking.
- Then complete the address list. In the cells below the column names, type appropriate information, such as the names, addresses, and phone numbers of your contacts.
Tip: for the overview, make the texts in the cells with titles/headings bold. To do this, click in the desired cell and use the shortcut Ctrl+B. The text in the cell is now bold.

To sort
The order of the address list can be changed at any time with the ‘Sort’ option. We want to put the list in alphabetical order, based on last name:
- Click on a cell that you have entered. It doesn’t matter which one, for example cell A1.
- Click on the tab Facts.
- click on Sort and filter > To sort.
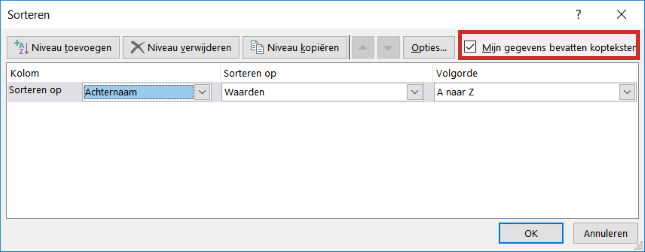
- A window opens. Check the box in the top right corner of this window My data contains headers. Indicates that you have created cells that contain titles/headings.
- Click on the arrow next to ‘Sort by’ and choose which property you want to sort by. We choose Last name.
- By default, Excel sorts from A to Z. Do you want to change this? Click in the field under ‘Order’ and click on the desired order.

- click on OK.
Tip: the next time you want to sort the contents of the columns, just click on the tab Start > Sort and filter. Then indicate what you want to sort by.
Filter addresses
In our address list we have put the relationship type (family, friend, colleague) in the last column. We use a filter to ensure that Excel only shows information about a certain relationship type. For example, only the data of family members.
- Click the cell that contains the title of the column you want to filter. In our case that is Relationship type.
- Click on the tab Facts.
- click on Sort and filter > Filter.
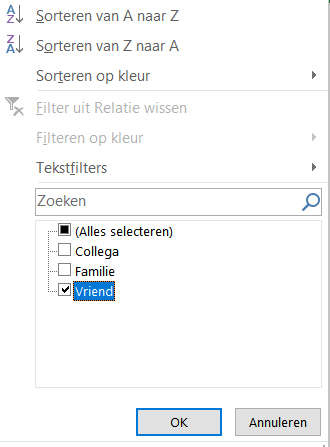
- Arrows appear in all cells with titles. Those arrows indicate that you can filter or sort something. We want to filter on a certain relationship type. Therefore click on the arrow in the cell ‘Relationship type’.
- At the bottom of the window that opens is a list of all the values you entered in the ‘Relationship type’ column. With us these are ‘Friend’, ‘Family’ and ‘Colleague’.
- Uncheck for Select all so you can decide what to filter on.
- Click on the item you want to filter on, for example Friend.

- click on OK.
- Only the address details of family members are now visible in the document. The details of friends and colleagues are hidden.
- In the ‘Relationship type’ cell, the arrow has changed to a filter icon. This shows that the data has been filtered. If you want to remove the filter, click on this icon.
- Then put a check in front of Select all and click OK.
Orientation
Printing a file from Excel can be tricky. Sometimes there are too many columns, so that not all information fits on one page. If you have many columns in the address list, it is best to choose the ‘Landscape’ orientation.
- Click on the tab Page layout.
- click on Orientation > landscape.
Dotted lines now appear on the Excel sheet. These lines indicate which data falls within the printed page.
Put mailing list on labels
Put the mailing list from Excel on labels in Word? Then read the article ‘Creating labels from address list’.