Orientation
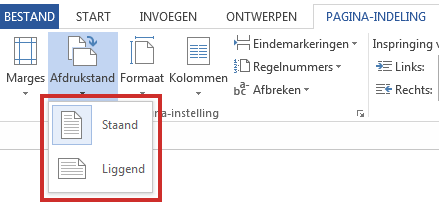
To begin, determine the orientation of the document: portrait or landscape (long edge paper horizontal). For example, a landscape orientation is useful for large tables that would otherwise not fit on the page.
- In the Ribbon, click on the tab Page layout or Layout.
- In the ‘Page Setup’ group, click Orientation.
- Click on the desired position: standing or landscape.

Margins and Columns
The margins of the document indicate the space between the edge of the paper and the beginning of the content. Adjusting goes like this:
- In the Ribbon, click on the tab Page layout or Layout.
- In the ‘Page Setup’ group, click margins.
- Click on the desired option: Normal, Narrow, Average, wide or Mirrored. click on Custom Margins to determine them manually.
In addition, you can also divide the content of the pages into columns. Once the first column is filled, the text automatically flows into the next column. If there is no text in the document yet, then after setting the columns there will be no difference with a document in the normal position.
- In the Ribbon, click on the tab Page layout or Layout..
- In the ‘Page Setup’ group, click Columns.
- Click on the desired number of columns.
Page color and page borders
Pages could be brighter with a color or border:
- In the Ribbon, click on the tab To design. With older versions of Word, the options below are on the tab Page layout.
- In the ‘Page Background’ group, click page color.
- Click on the desired color.

Don’t want to color the entire page, but just a border around the page?
- In the Ribbon, click on the tab To design, or in older versions of Word at Page layout.
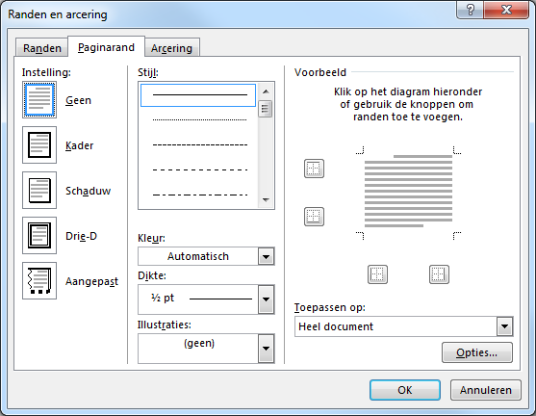
- In the ‘Page Background’ group, click Page Borders.
- The new Borders and Shading window appears. Make sure the ‘Page Border’ tab is open.
- Under ‘Settings’ you can click on the border you want.
- You can also determine the style, color and thickness.
- Finally click OK.

Text Effects
The page is formatted, time to type the text. There are many options for creating this. Font, font size and color of the letters can be adjusted. Another great option for headings, for example, is ‘Text Effects’. Gives a text a shadow, reflection, or glow. It goes like this:
- Select the piece of text you want to give the effect.
- In the Ribbon, click on the tab Start.
- In the ‘Font’ group, click the A icon with blue glow.
- Click on one of the options, for example ‘Shadow’, ‘Reflection’ or ‘Glow’.
- Repeat these steps for other effects or colors.
Pictures
Insert images for even more vibrancy:
- Place the cursor (the blinking vertical line) where you want the image to appear.
- In the Ribbon, click on the tab Insert.
- In the ‘Illustrations’ group, click Pictures > This device.
- If necessary, go to the ‘Pictures’ folder in the window that opens.
- Scroll to the desired image and select it by clicking on it.
- click on Insert.
- The image you chose is now displayed in Word.
- A new tab has now been added to the Ribbon: ‘Picture Tools – Format’ or ‘Picture Format’ or ‘Picture Format’. It contains functions to edit the image.
Crop images
The image may still need to be cropped. That means you are taking off part of the image.
- Click on the image so that it is selected.
- The ribbon now contains the extra tab Picture tools, Image format or Image format. Click here.
- In the ‘Size’ group, click crop.
- Then click crop.
- Black brackets appear around the picture. Hover over one of those hooks.
- When the mouse pointer changes to the hook, press the left mouse button.
- Move the pointer inward to crop the image and release the mouse button.
- If necessary, undo the crop by dragging the brackets outward.
- Press the Enter key to finalize the crop.
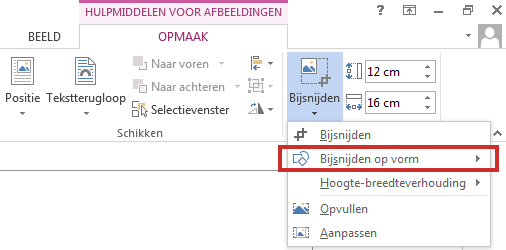
You can also crop with all kinds of shapes:
- Click on the image so that it is selected.
- Click on the extra tab Picture Tools or Image format or Image format.
- In the ‘Size’ group, click crop and then on Crop on/to shape.
- Click on the desired shape.

Text Wrap
Once you insert an image, Word applies the default text wrap. The function specifies how text wraps around an image. By default there is text on one line, the image on the next line and text on the line below. That can be adjusted.
- Click on the image so that it is selected.
- Click in the Ribbon on the extra tab Picture Tools or Image format or Image format.
- Under ‘Arrange’ or ‘Arrange’, click Text wrapping.
- Click on one of the options you want.
- You can change this as often as you want; so feel free to try out some options.