
Have you ever had trouble staying awake during a presentation with slides that only contained text, with a funny intended image as the topper? Most presentations look like they are from the 90s, while the graphical possibilities of the program have improved enormously. We show how to upgrade every presentation that you create in PowerPoint by using graphic tricks.
Tip 01: Design ideas
Microsoft also knows that PowerPoint has a lot to offer, but most users hardly use any of that potential. If you use Office 365 and want to make a presentation in PowerPoint, you immediately get a large number of graphically attractive options to shape your presentation. For a rush job, such a preset template is not a bad choice at all. If you are making your presentation and need inspiration for a creative slide layout, consult Designs / Design ideas, with this Microsoft helps you a good way on your way. Yet it is not a solution for a presentation that really has to pop. Too often no design ideas are displayed for that and you end up with a fairly standard presentation.
Tip 02: Graphical functions
If you want to add graphic improvements to a presentation yourself, there are plenty of options for that in PowerPoint. You just have to find them, because often they are options that you don’t immediately associate with creating a presentation. Moreover, many options are not immediately visible, but only become active when you select a photo or text. The reason for this is that Microsoft does not want to make its programs too complex and therefore hides certain functions in menus that only become visible if they are really relevant. If you have less experience with PowerPoint, or Office 365 in general, then it will take some getting used to in the beginning.
Different versions
The core of PowerPoint has not changed significantly in many versions. That does not make it crazy to think that you can still work well with PowerPoint 2007 or 2010. In part that is true. But it is precisely in the latest versions of PowerPoint (2016 and 2019) that Microsoft is investing heavily in the graphics capabilities of the program. If you want to use those options, then it is necessary to upgrade. With Office 365 Home you always get the latest version automatically, but you are stuck with a subscription for which you have to pay ten euros a month or 100 euros a year.
If the company where you work already has Office 365, in many cases you may also use it as an employee at home and via Surfspot.nl students can use Office 365 for a small amount per year. These ways allow you to get started with the newest Office and therefore PowerPoint well below the regular price.

Especially in recent years, Microsoft has invested a lot in the graphic possibilities of PowerPoint
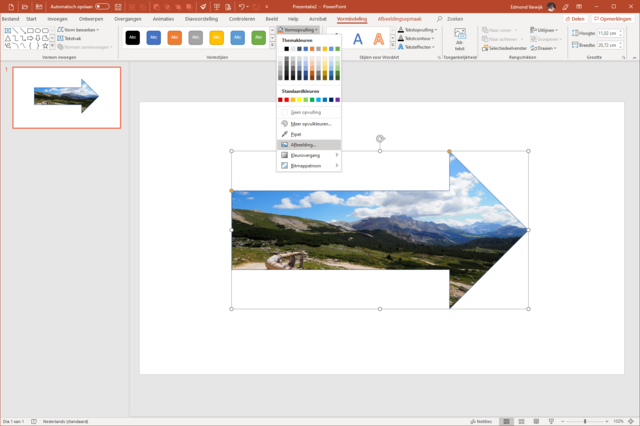
Tip 03: Image in shape
An option that you can use for nice graphic effects in PowerPoint is to fill a shape with a photo. Start by inserting the form via Insert / Form and choose the shape. Now draw the shape to the desired size and location with the mouse. The shape should still be selected now, otherwise click the shape once with the mouse. Choose now Shape layout / Shape fill / Image. There are three options to insert an image, we choose a photo from our PC, so we click From a file. Now select the photo on the PC and click Insert.
Slide layout
Each slide in PowerPoint has a standard format. Examples include a title with a subtitle, a title with a photo below it, or a slide with content and text. These standard formats are useful if you want to display textual content, but for graphic effects, those formats are especially difficult. You just want an empty slide, so that you are not bothered by all kinds of courses. To adjust the layout of an existing slide, right-click on the slide in the preview window and choose Layout / Empty. If you add a new slide, you can go through Slides / New slide immediately select the desired layout.

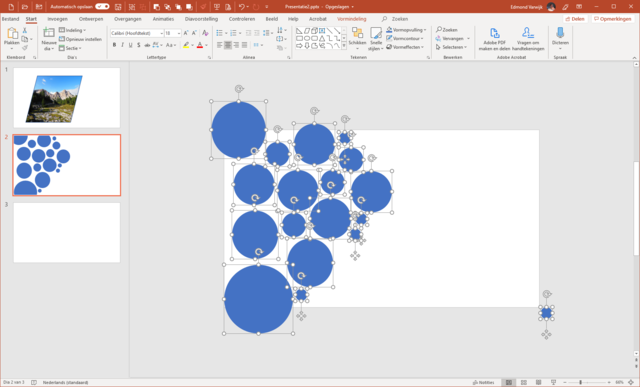
Tip 04: Working with shapes
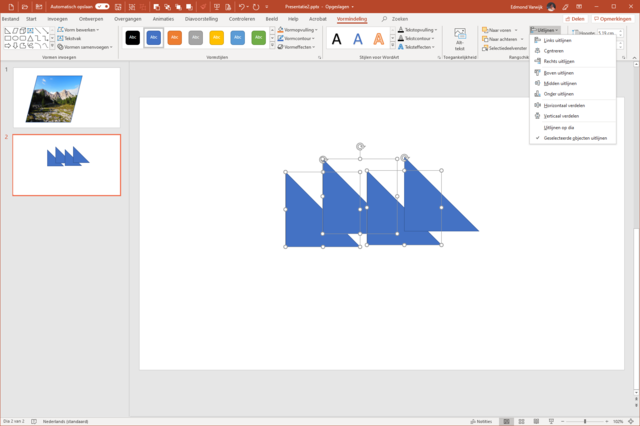
If you want to make a presentation look graphically interesting, then play forms an important role. It is therefore useful to know a little more about working with shapes. A first skill has to do with inserting a shape. With Shift pressed, PowerPoint automatically makes all sides of a shape the same size. A rectangle thus becomes a square, a triangle an equilateral triangle and a circle a real circle. By default, the shape is stretched to one side, that in which you move the mouse. But if you press the Ctrl key, the shape will be made larger in both directions. To duplicate a shape, use the key combination Ctrl + D after which you can move the copied shape. You can also hold down Ctrl while dragging the shape to another location with the mouse. You can rotate a selected shape via the round arrow above it, but this can also be done very precisely via Format / Arrange / Rotate. This menu also offers the possibility to mirror a shape vertically or horizontally. If you have multiple shapes and you want to align them to the same height, use the mouse to select the relevant shapes by dragging a square over them, or click, with the Ctrl key pressed, on all shapes that you want to align. Then choose Format / Arrange / Align and select how you want to align the shapes.
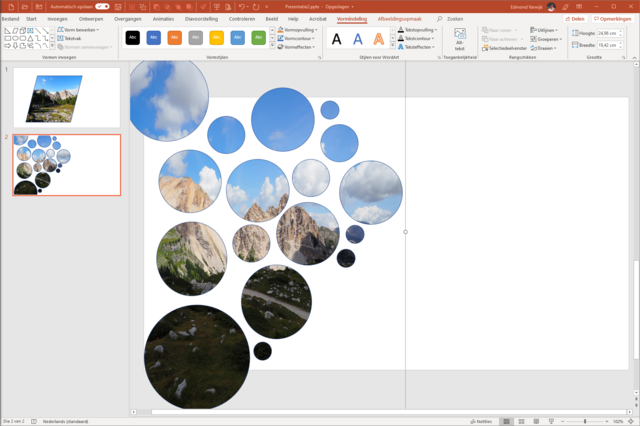
Tip 05: Photo in two forms
Do you want an image on your slide in a shape that you cannot find between the standard shapes? Then create it yourself by combining multiple shapes. But for this a new slide with an empty layout on. Add a circle via Insert / Form and select Oval. Draw an oval and press Shift to turn it into a circle. Press Ctrl + D to duplicate the circle and place the new circle next to the first one. Make the circle smaller or larger. Add more circles until you get an attractive shape with multiple circles of different sizes. Also make some circles that go over the edge of the slide. If the composition is satisfactory, select all circles, for example with Ctrl + A. First remove the lines around the shapes Shape layout / shape contour / no contour. With all forms still selected, create via Format / Arrange / Group / Group one form of all loose forms. The grouped shape is automatically selected. Then click Shape layout / Shape styles / Shape fill and choose again Image / From a file. Select an image and choose Insert. The image is now placed in all shapes, which can give a nice effect.
Tip 06: Add original
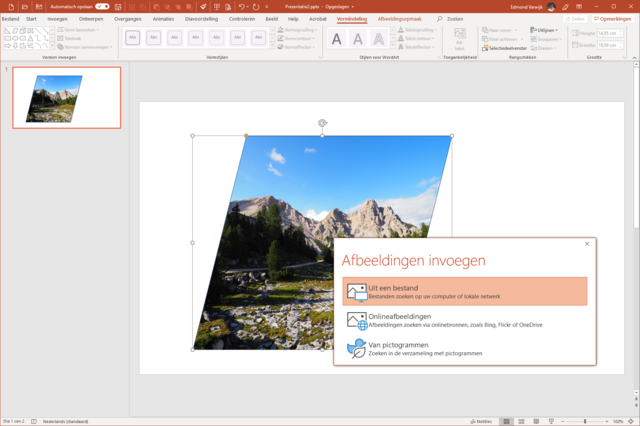
Depending on the photo you used and the effect you want to achieve, it can add an extra dimension to the slide by using the original photo as the background. Choose Insert / Image and select the photo that you have also used to fill the shape (s). Confirm with To open. PowerPoint now places the photo in the slide. Now drag the photo over the grouped shapes and pull on the sides of the photo until it is exactly the same as the shapes. The automatic completion of PowerPoint helps you with this. Then choose Image format and move the photo via Sort / Move backwards behind the forms. Make now through Image format / Adjust / Color the photo in black and white or gray, or select one of the other effects.
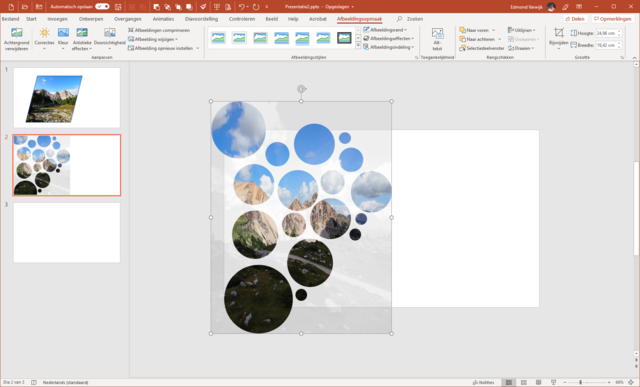
Place a shape outside the slide so that you can easily place the background over the entire slide
Tip 07: Full page
A limitation of adding the background photo and making it the same as the grouped shape is that the background photo takes up only part of the slide. For the overall picture it is better when the background photo covers the entire slide. This is difficult, but not impossible. When placing the shapes, see tip 5, add one extra shape to the other side of the slide, outside the slide. Now select all shapes, including this extra shape and group them into one shape. Add the image again. Then continue as described in tip 6 to add the background to the slide. Because of that one shape outside the slide, it has now become possible to place the background image over the entire slide.
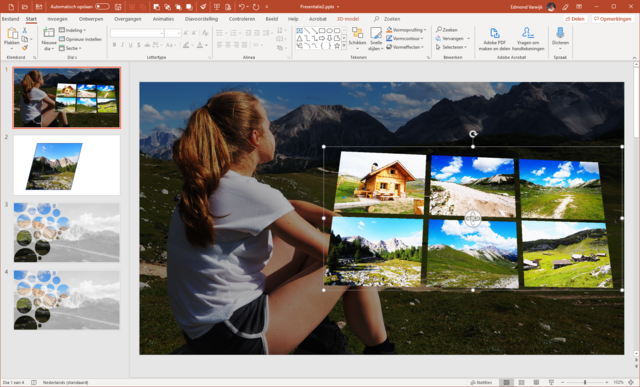
Tip 08: Create a 3D model
You can achieve an even better effect with multiple photos. Add a blank slide and choose Insert / Image. Now add six photos that either all six have the portrait format (upright) or all six have the landscape format (landscape). Click the photos with Ctrl pressed and add them to the slide in one go. Then select all six photos by dragging a rectangle with the mouse button. Now place the mouse button on one of the fill handles (the white circles on the corner of the selection) and make the photos all smaller at once so that they are small enough to fit together on a slide. Now click next to the photos to deselect the selection and place the photos neatly next to each other with an equally large space between the photos. The automatic alignment of PowerPoint can help you with this. Select all photos again and place them on the clipboard with Ctrl + X or Start / Clipboard / Cut. Then open the program Paint 3D. click on New and then Ctrl + V paste the contents of the clipboard into the 3D document. Click now Make 3D and then click Menu / Save as / 3D Model to save the 3D model on your computer.

Tip 09: 3D in PowerPoint
Not only Paint 3D is new in Windows 10, also the support for 3D models in Office is new. We show you how to use this. Exit Paint 3D and return to PowerPoint. Select the blank slide and first create the background of the slide. Use a photo that matches the six photos you use in the 3D model. The best thing is a photo where the subject is clearly left or right. If the photo does not match the size of the slide, choose Image layout / Cropping / Aspect ratio / 16: 9. Click outside the photo to finalize the cropping and then fill the photo for the entire slide. Use the options Image layout / Adjust / Corrections and Color for example, to darken the photo. Then choose Insert / 3D models / From a file. This option is hidden under the arrow next to the 3D models button. Now browse to the 3D model that you previously created in Paint 3D and choose To open. The model is inserted and by clicking on the 3D symbol in the middle of the object, you can rotate it in all directions.
Professional templates
If you have to give a presentation, but lack the time to do it yourself, you can save a lot of time with a ready-made PowerPoint template. Through File / New PowerPoint offers a choice of a number of templates for presentations and via Search online templates and themes you can find even more. If you really want something beautiful, then search for “professional powerpoint template free” for a range of free templates, but watch out for aggressive advertising and even viruses. And although no one likes to pay for what is also free, you can purchase very nice templates for a relatively small amount. We are then talking about ten to twenty euros for a professionally designed template with many possibilities. Good sources are graphicriver.net, powerpointify.com, envato.com and slidemodel.com.

You can also have a video play in the background of your slide
Tip 10: Background video
Not an image, but rather a video as the background of your slide? Then make a blank slide and choose Insert / Video / Video on my PC. Select a video and place it full screen on the slide. Select the video and choose Play / Video options / Start / Automatic. Here too you can apply all kinds of graphic effects, and above all you can also apply the previously applied graphic effects to this slide.
To set an image from the video as a form fill, start VLC Media Player (free to download from www.videolan.org). Then click Tools / Preferences and choose bottom left at the View options in front of Everything. In the list of options, browse to Video / Filters and select Scene filter. Configure as options at Prefix folder path the folder where you want to save the film images and with Recording ratio the value for how many movie images you want to save. Now go back to Filters and place a check on the right Scene video filter and then click Save. Now open the movie file and play it. VLC will now save the stills in the specified folder. You can then view one of the saved images as Form filling with the moving video in the background.
