Printing labels is useful, for example, when you have to send a lot of mail. It is not necessary to write down the addresses yourself. How do you create and print labels in Word 2016 or 2019?
Buy labels
You need printable label sheets for label printing. These are for sale at various (web) stores. Well-known brands are, for example, Avery, Xerox and Hema. Labels are available in different formats. Before purchasing, consider approximately how much printing space you will need on a label.
Word version
In this article we will cover the steps in Word 2016. They are the same for Word 2019. Word is for sale as part of the Microsoft Office package and as part of the Microsoft 365 online package. Are you not yet familiar with Word? Then it is advisable to first read the article ‘Word: the basics’.
Do you have Word 2013? Then read the article ‘Word: creating labels (Word 2013)’.
Do you have Word 2010? Then read the article ‘Word: creating labels (Word 2010)’.
Step 1: indicate brand labels
First indicate which labels you are using. Word 2016 then knows exactly how much print space each label needs. Follow the steps below:
- Open a blank document in Word.
- Click on the tab Mailing Lists.
- In the ‘Create’ group, click labels.
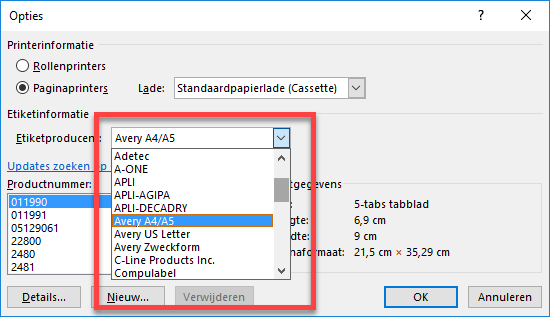
- click on Options.
- Click on the down arrow in the drop-down menu behind ‘Label manufacturer’.
- Click on the brand of label sheets you are using.

- Under ‘Product number’, select the corresponding product number (which can be found on the packaging of your labels).
- click on OK.
Tip: choose one of the available labels if your label type is not available. Or click Options on New to specify custom sizes for mailing labels.
Step 2: Enter address details
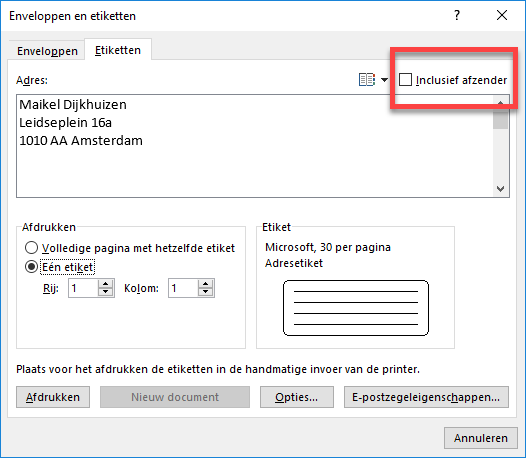
In the “Address” box, do the following:
- To create address labels, enter an address.
- Put a tick in front of Including sender if you also want to specify a sender’s address. Edit the sender address if necessary.

Step 3: Print Label
To print an address on one label or the entire sheet of labels, do the following:
- In the ‘Print’ box you can choose from two options:
- If you want to print a single address label, please check A label. Then choose the row and column number of the label you want to print (one row is horizontal, one column is vertical). This way you select which label of the label sheet the address will appear on.
- If you want to print the same data on all labels on the sheet, check Full page with the same label. click on Options if you want to change the printer label type or tray. Then select the desired options and click OK.
- Load a sheet of labels into the printer.
- click on Print.
Tip: first make a test print on an ordinary A4 sheet. Then you can see if the address ends up in the right place.
Step 4: different addresses on one sheet
Do you want to print different addresses on a label sheet? Then make a page with various labels. This goes like this:
- In the Envelopes and Labels dialog box, click New document.
- A new label document opens. You see a blank Word document with the outlines of the labels in dotted lines. Type the desired information on the labels you want to use. You can also insert pictures for labels or tags.
- Under the ‘File’ tab, click Print.
- Confirm with Print to print the labels.
- click on Save as if you want to save the label page for later editing or printing.