Other Word versions
In this article, we’ll discuss using images in Word 2010.
- Do you have Word 2019? Then read the article ‘Word: images (Word 2019)’.
- Do you have Word 2016? Then read the article ‘Word: images (Word 2016)’.
- Do you have Word 2013? Then read the article ‘Word: images (Word 2013)’.
- Do you have Word 2007? Then read the article ‘Word: images (Word 2007)’.
Not familiar with Word?
Not familiar with Word 2010 yet? Then it is advisable to first read the article ‘Word: the basics (Word 2010)’.
Article structure
Step 1: Insert a picture
- Place the cursor (the blinking vertical bar) where you want to insert an image.
- Click on the second tab in the ribbon Insert.
- Press the button Image.
- Scroll to the desired image and select it by clicking on it.
- click on Insert.
- The image you chose is now displayed in Word.
Step 2: Edit images
You can then adjust the image you inserted in Word. For basic operations, such as resizing, this is excellent. If you want to perform multiple or advanced edits, such as straightening the horizon or removing red-eye, you must first edit your photos in an image program such as Photo Gallery before inserting them into Word.
The various image editing functions become active in Word automatically when you click on the inserted image:
- Click on the inserted image (if not already selected).
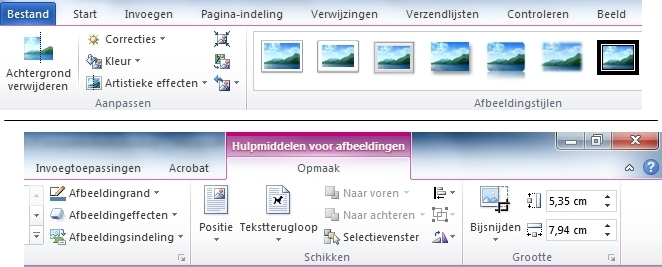
- An additional tab will be added to the ribbon: the Format tab. Click this (if not already open).
- You will see that this tab has several buttons. If you hold the mouse over a button, you will see an explanation box.
Step 3: Buttons on the Format tab
Chances are you want to adjust the inserted image. The buttons on the ‘Layout’ tab serve this purpose. In the first group, ‘Adjust’, you will find buttons for ‘Corrections’, ‘Color’ and ‘Artistic Effects’. You control the position of the image in the second group from the right: ‘Arrange’. You can reduce and crop the image in the ‘Size’ group on the far right.

Step 4: Adjust brightness, contrast and sharpness
Under the ‘Corrections’ button you can make a photo sharper or softer. You can also adjust the brightness (lighter and darker) and the contrast between the colors in one operation.
- In the ‘Edit’ group, click Corrections and mouse over the examples under ‘Sharpen and soften’. You will immediately see the effect on the photo and click on the option you are satisfied with.
- In the ‘Edit’ group, click Corrections and mouse over the examples under ‘Brightness and contrast’. Here too you immediately see the effect of an option and you can choose the one that seems best to you.
Step 5: Adjust the colors
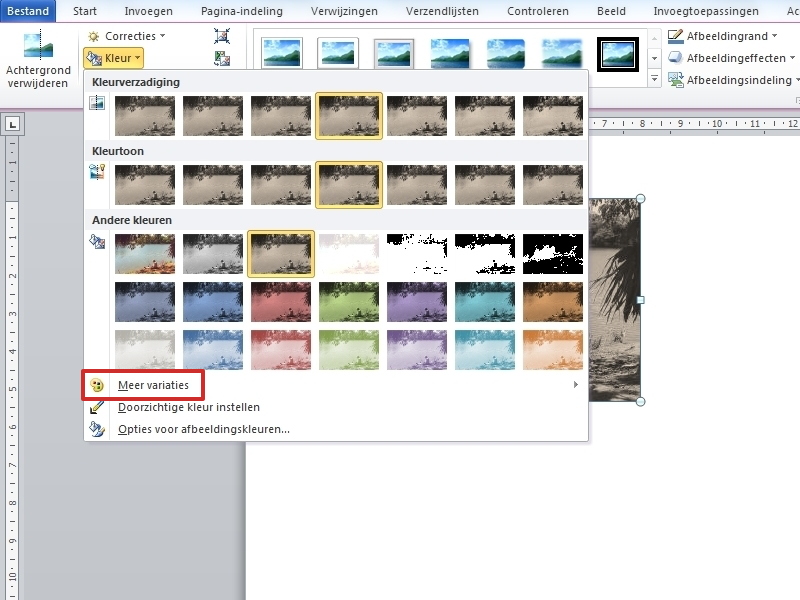
- In the ‘Edit’ group, click Colour.
- Choose one of the options. For example Sepia for a photo with a nostalgic touch.
- In the same window you can choose even more colors under ‘More variations’.

Step 6: Add an Effect
With the button ‘Artistic effects’ you can give an effect to your photo.
- In the ‘Edit’ group, click Artistic Effects.
- Choose one of the options, for example Paint strokes for a truly artistic effect.
Step 7: Place or move the image
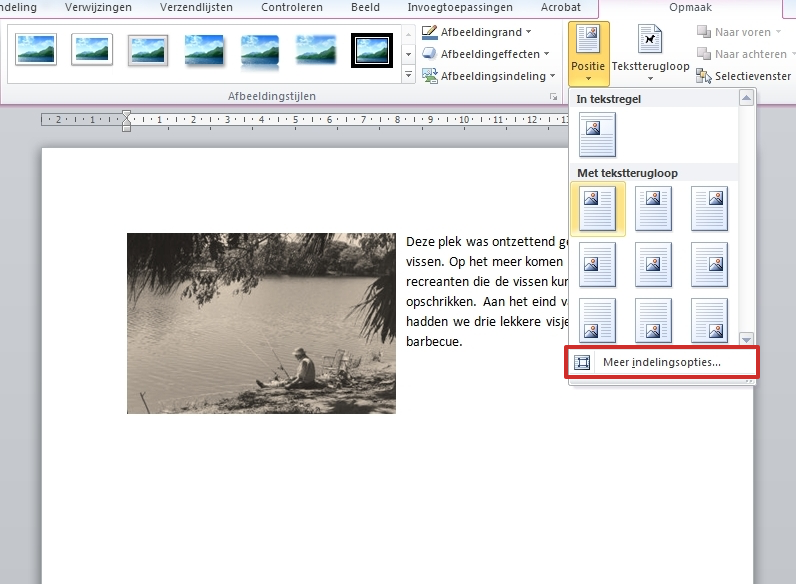
- In the ‘Arrange’ group, click the button Position.
- You choose one of the options to change the position of the image. For example, you can choose to display the image on the left, right, below, above or in the middle of the text. By the way, you can also move a picture by clicking on it and then dragging it with the mouse.
- click on More layout options on the ‘Text wrapping’ tab to place the picture behind or in front of the text. You will also find these layout options if you click on the ‘Format’ tab in the ‘Arrange’ group Text wrapping clicks.

Step 8: Adjusting the Size
- Adjust the number of centimeters (height and width) in the right group ‘Size’ with the small blue arrows. The correct proportion is maintained.
- Click on the picture. A frame border and squares and dots appear around the image. Click and drag the squares to make the image wider or taller. The image is out of proportion.
- Click and drag the dots to enlarge or shrink the image by the correct proportion.
Step 9: Crop the Image
- Click in the right group ‘Size’ on crop.
- Black brackets appear around the picture. Hover over one of those hooks.
- When the mouse pointer changes the hook, press the left mouse button.
- Move the pointer inward to crop the image.
- If necessary, undo the crop by dragging the brackets outward.
- Press the Enter key to finalize the crop.