Ready for a new kitchen or bedroom? How do you optimally organize these rooms? There are interesting tools with which you can visualize your new interior on the computer. Such as Floorplanner, with which you can furnish a house digitally in no time.
Before you get started with the digital furnishing of your home, make sure you prepare well. Accurately measure the rooms you want to furnish. This concerns the length, width and height. It is also important to know where obstacles are located, for example walls that you cannot move. The same applies to the position of windows.
Also make notes of existing connections, for example for drainage and electricity. If you have a iPhone you can use it cleverly to measure the dimensions of objects. You use the built-in Measure app for this. This is less accurate than a tape measure, but is well suited for quickly mapping global dimensions.
With that knowledge in your pocket, surf to the site of Floorplanner. A distinction is made here between different subscription types, whereby the Basic account is free. Floorplanner works with a points system. If you need extra functionality, for example because you want to design an extra floor, you can buy credits to make these extra functions available.
Working with Floorplanner
On the right side of the screen you will find the canvas, on which you make the design within Floorplanner. Use the buttons at the top right to switch between the different views of the design. The button with the gear wheel is particularly interesting: it gives access to an overview of all parts of the interior, such as furniture, but also shadow lines. For each part you can determine whether or not it should be shown in the design.

With the button 3D you switch from a two-dimensional to a three-dimensional view. Immediately make sure that the units are set correctly: click the button at the bottom of the page M.so that the metric units become active. At the top left you will find the different floors. Directly below you will find the menu bar with which you make the actual design.
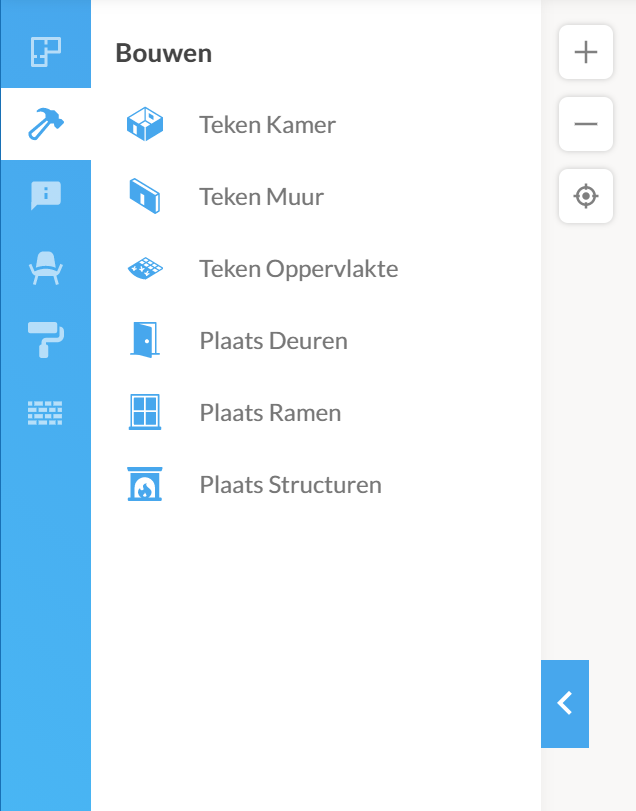
The beam is made up of six parts. You can create a design per floor via the top button. Here you can also adjust the general settings of the design, for example by adjusting the shape of a room or adding lights to the design.


The second button, To build, gives access to the parts with which you build the space. These are walls, doors, windows and fixed obstacles, called structures by Floorplanner. Tap a category to get started with it and make a selection within the section. For example, if you choose doors, you can then indicate how the door should turn.
If you opt for structures, you can choose from various parts, such as fixed stairs and heating elements. Via the button below, Info, you determine the general characteristics of the room, such as the room type.
To quickly measure a room, there is the tape measure. In practice, this turns out to be especially useful for determining the mutual relationships between parts. You will find the tape measure as a button next to the units buttons: at the bottom of the design window. Place the ribbon at the beginning of what you want to measure, hold down the mouse button and drag to the end point.
Decorate!
As soon as the room is ready, you can get started with the actual furnishing. Select the room type from the list: based on this, a selection will appear with typical furniture for that room. Don’t let this limit you: you can also use furniture from other rooms and other categories.
To open another category, use the list that is shown below the overview of room types. Select a part and drag it to the map on the right side of the window.
When the room is decorated, click on the button with the paint roller. Via this section you determine the colors of the room. You can choose from a color fan, but it is also possible to enter a color code in the box at the top.
Or choose a material, such as wood or stone. To do this, click on the last button, Materials, and choose the desired media type from the list. It’s a hefty amount, so the search bar at the top comes in handy.
3D in Floorplanner

Earlier you read about the possibility to switch between a two- and three-dimensional view in Floorplanner via the buttons at the top right of the design area. Finally, we will take a look at that. First click 3D. The box appears on the left Camera settings. Use the virtual camera to adjust the height and angle.
You can switch between the different cameras via the menu above. To quickly switch to an aerial view, so that you can clearly see the different rooms at once, click the button to the left of the puppet in the top right corner. This view is useful for quickly switching between the different rooms.
Click on the room you want to zoom in on. You can request the 3D settings via the button with the gear wheel. Here you determine, among other things, whether ceilings and shadows should be shown.
We have now roughly gone through the options of Floorplanner. Make something beautiful!
.